HTML tags are pieces of code you add to webpages to provide context to search engines. They help search engines determine what your site is about.
HTML stands for hypertext markup language. It’s the language used by websites.
Tags are also used to structure content. And define how it should be displayed in a web browser. They’re helpful for search engines. And humans.
HTML tags are enclosed in angle brackets ( < > ) and typically come in pairs—an opening tag and a closing tag. The opening tag indicates the beginning of an element. While the closing tag indicates the end of the element.
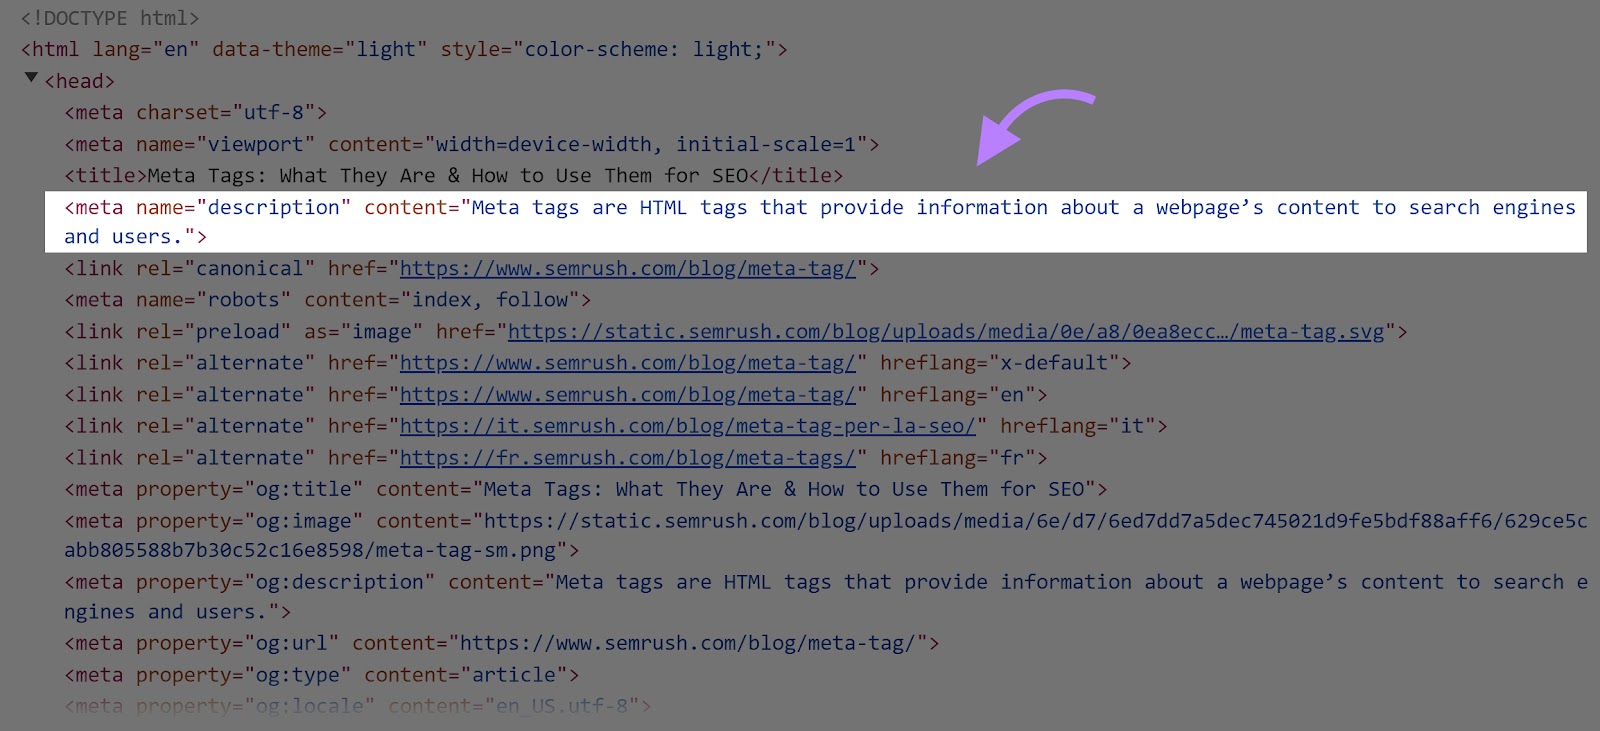
For example, here’s what a meta description tag looks like in the source code:

And here’s what a meta description looks like on Google:

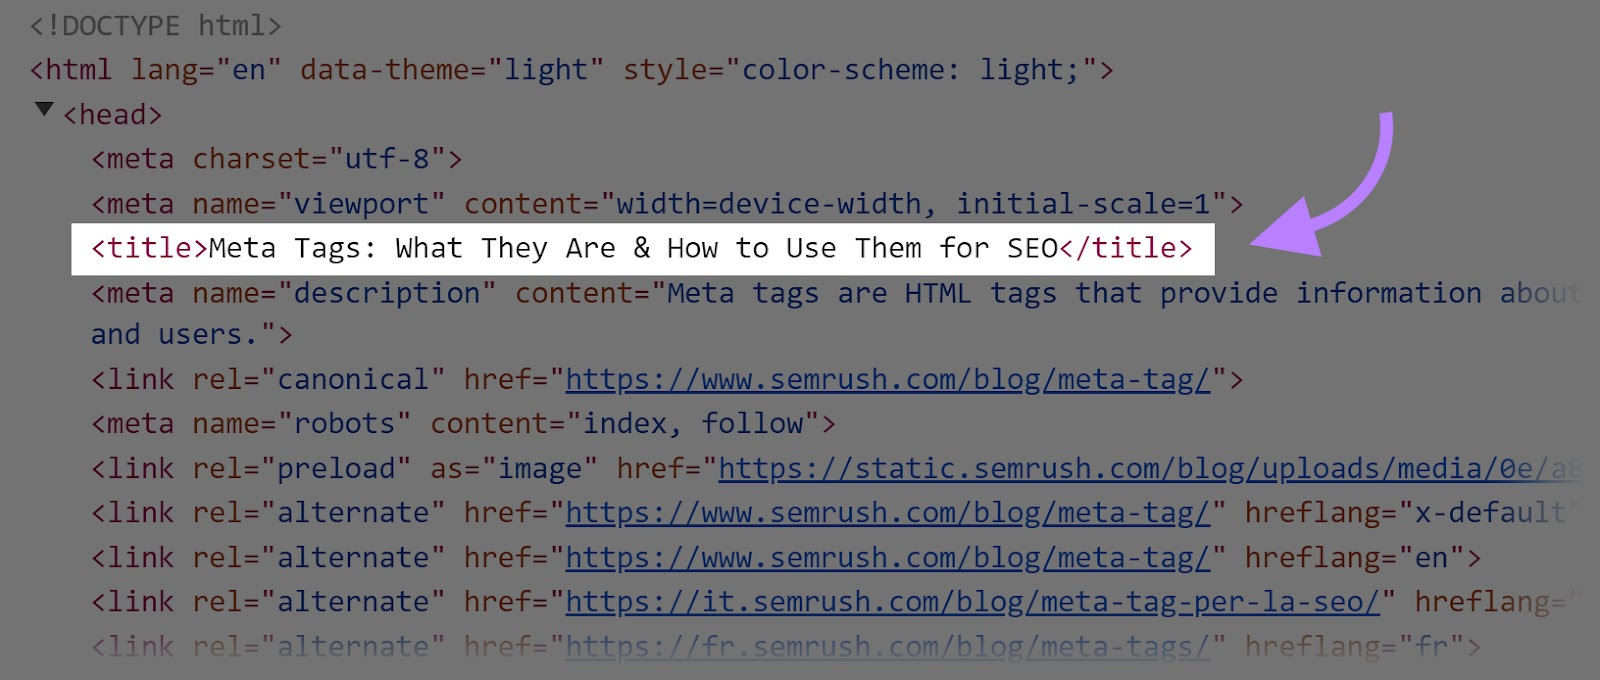
A title tag tells search engines that a specific phrase is the title of the page.
Here’s what it looks like in the source code:
And here’s what it looks like to web visitors:

HTML tags are beneficial to your website. And visitors. Here’s how:
Structure
HTML tags help you organize and format your content.
This includes:
- Headings
- Paragraphs
- Lists
- Tables
Search engines can better interpret and index your content with HTML tags.
Understanding
HTML SEO tags provide context to search engines about the purpose of different elements on your page.
By using relevant tags like <title>, <meta>, and <alt>, you help search engines understand the topic and purpose of your content.
Readability
HTML tags structure content visually for web visitors and search engines. Clear headings, bullet points, and well-formatted text make your pages easier to read. And help keep users engaged.
Keyword Optimization
HTML tags allow you to specify important keywords and phrases related to your content. Search engines can use these keywords to determine the relevance of your page to specific search queries.
Let’s discuss the most important HTML tags for SEO. And user experience.
A title tag is an HTML element used to specify a webpage’s title. It’s displayed on search engine results pages (SERPs) as a clickable link.
Title tags are important for user experience and SEO. They provide a concise description of the page. So searchers know what to expect when they click through. And help search engines understand the content.
Here’s what a title tag looks like in the SERP as a clickable link:

The tag is also displayed in the user’s browser tab.

To add a title tag, use the attribute <title> in your HTML builder.
Add an opening <title> tag before the text you want to show as your title. And a closing </title> tag at the end of it.
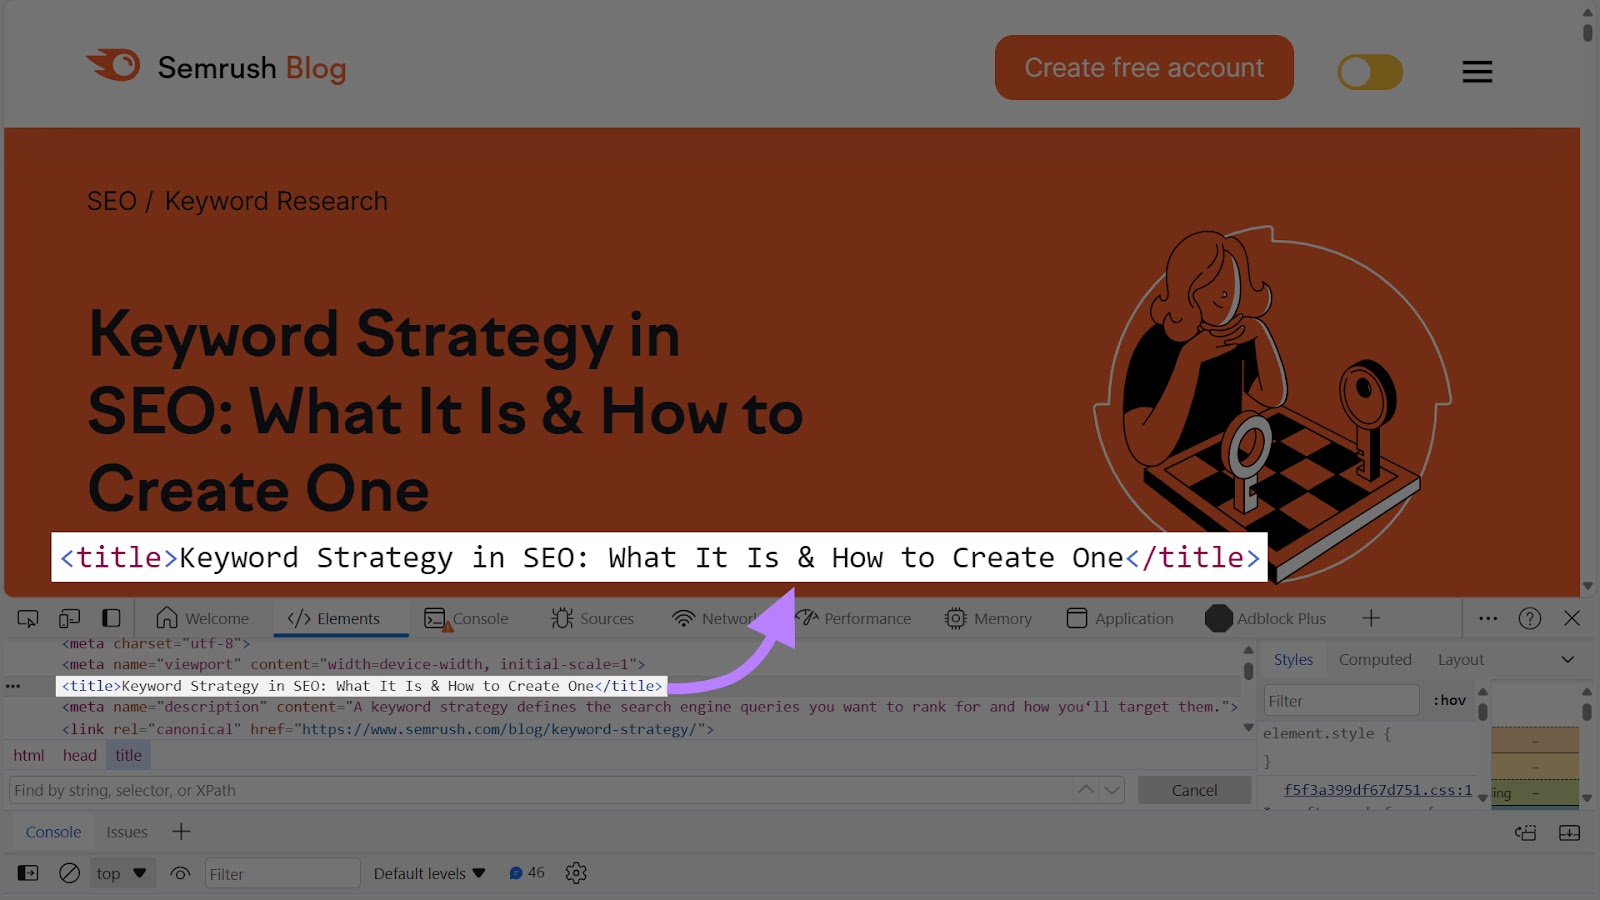
Your content management system (CMS)—like WordPress or HubSpot—might automatically create your <title> tag once you add a title to your webpage.
Title Tag Best Practices
- Keep it concise: Aim for 50–60 characters. If your title exceeds this range, it could be cut off in search results. As Google can only display up to 600 pixels (or about 60 characters).
- Don’t duplicate title tags: Make every title unique to help search engines determine the page’s purpose
- Use the main keyword: Include your primary keyword (the main term you’re targeting for the page) to indicate the content’s topic
- Analyze the SERP: Do a Google search for the topic of your content. Look at the titles that appear for high-ranking pages and the keywords those titles use. This will give you an idea of the keywords you should also use to help your content rank.
- Be consistent: A title tag should be the same or similar to the page’s H1. Both elements help search engines understand the main topic.
- Front-load key terms: Use the most important words at the beginning of the title. So it’s easy for searchers to find what they’re looking for.
A meta description is another HTML meta tag for SEO. It’s a short description of your webpage that can be displayed on search engines. And some social media previews.
Meta descriptions are tags that provide a brief explanation of the content of a page. They often appear below the title tag on SERPs.
While meta descriptions aren’t a ranking factor, they can impact your click-through rate (CTR). And bring people to your site. An enticing meta description can increase the likelihood of users clicking on your link.
Tools like Yoast and Rank Math make it easy to add meta descriptions without having to update the HTML.
A meta description code snippet looks like this in the HTML:
<meta name="description" content="Learn how to develop a tone of voice for your brand and use our template to get started.">
The name=”description” element signifies the type of metadata you’re providing (a description).
The content=” element is where you add a description of what your webpage is about (inside the second pair of quotation marks).
This is what a meta description looks like on search engines:

Meta Description Best Practices
By writing a meta description that intrigues the searcher, you may get more traffic to the page. Improving the CTR.
Here are some best practices:
- Describe what your content is about. So searchers know what to expect when they click through to your site.
- Aim for a concise description of under 155 characters. Longer meta descriptions may get cut off in the SERP. If you optimize for mobile, stick to around 105.
- Include your primary keyword
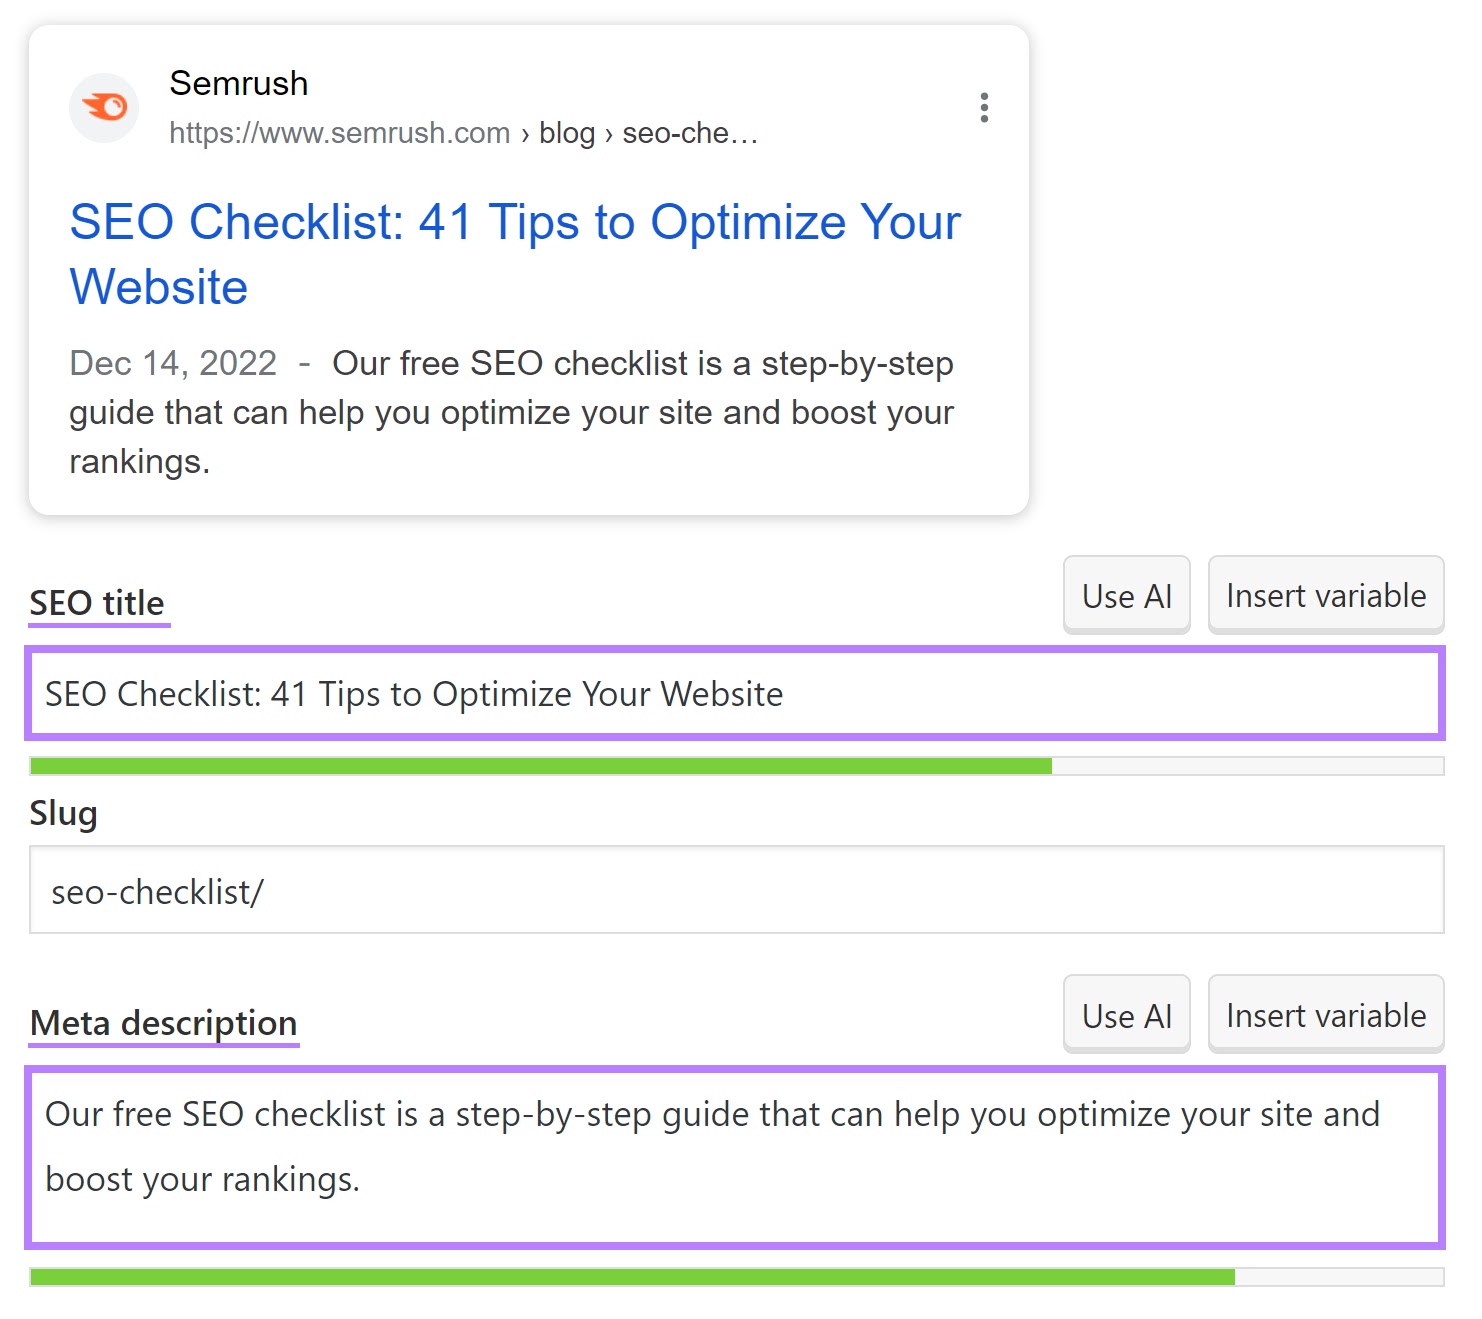
- Use a plugin like Yoast or Rank Math to help you follow best practices for character length. And keyword usage.
Yoast’s plugin looks like this:
Header tags, like <h1>, <h2>, and <h3>, help you define each heading and subheading on a page. And help you structure content on all types of pages. Including your homepage, service pages, product pages, blog posts, and more. To make it easier for visitors to read and understand.
They also help search engines understand the hierarchy and context of the content.
The larger the heading size (H1 > H2), the more important it is to include a keyword or descriptive phrase.
Since headings have the potential to be more important than plain text (they help indicate page structure), you should optimize them with keywords when possible.
In HTML markup, the following header tags are common:
- Heading 1 <h1>: Main heading/title of the page
- Heading 2 <h2>: Secondary heading
- Heading 3 <h3>: Subheading of an <h2>
- Heading 4 <h4>: Subheading of an <h3>
- Heading 5 <h5>: Subheading of an <h4>
- Heading 6 <h6>: Subheading of an <h5>
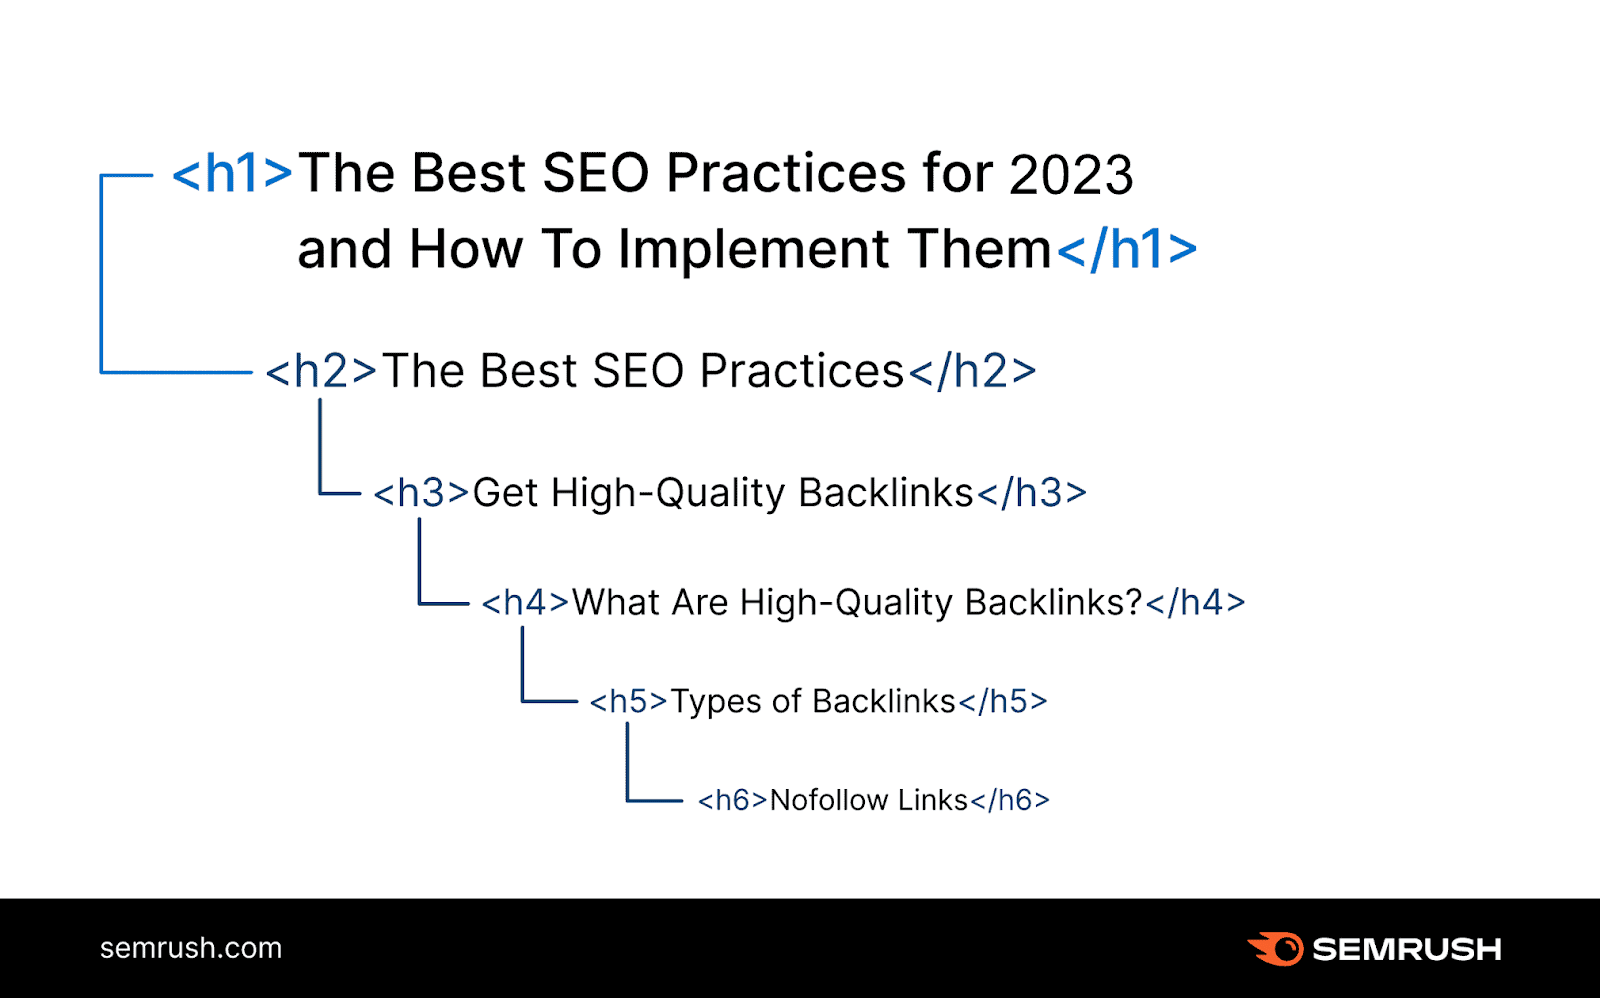
For example, H1 tags tell search engines what a page’s main topic is. And organize the content clearly. They also show visitors that the page has the information they’re looking for.
Here’s what an H1 looks like in HTML:

And here’s what it looks like to a visitor:

To add a heading 1 tag in the HTML, you’d use the opening <h1> at the front of the heading. And a closing </h1> at the end.
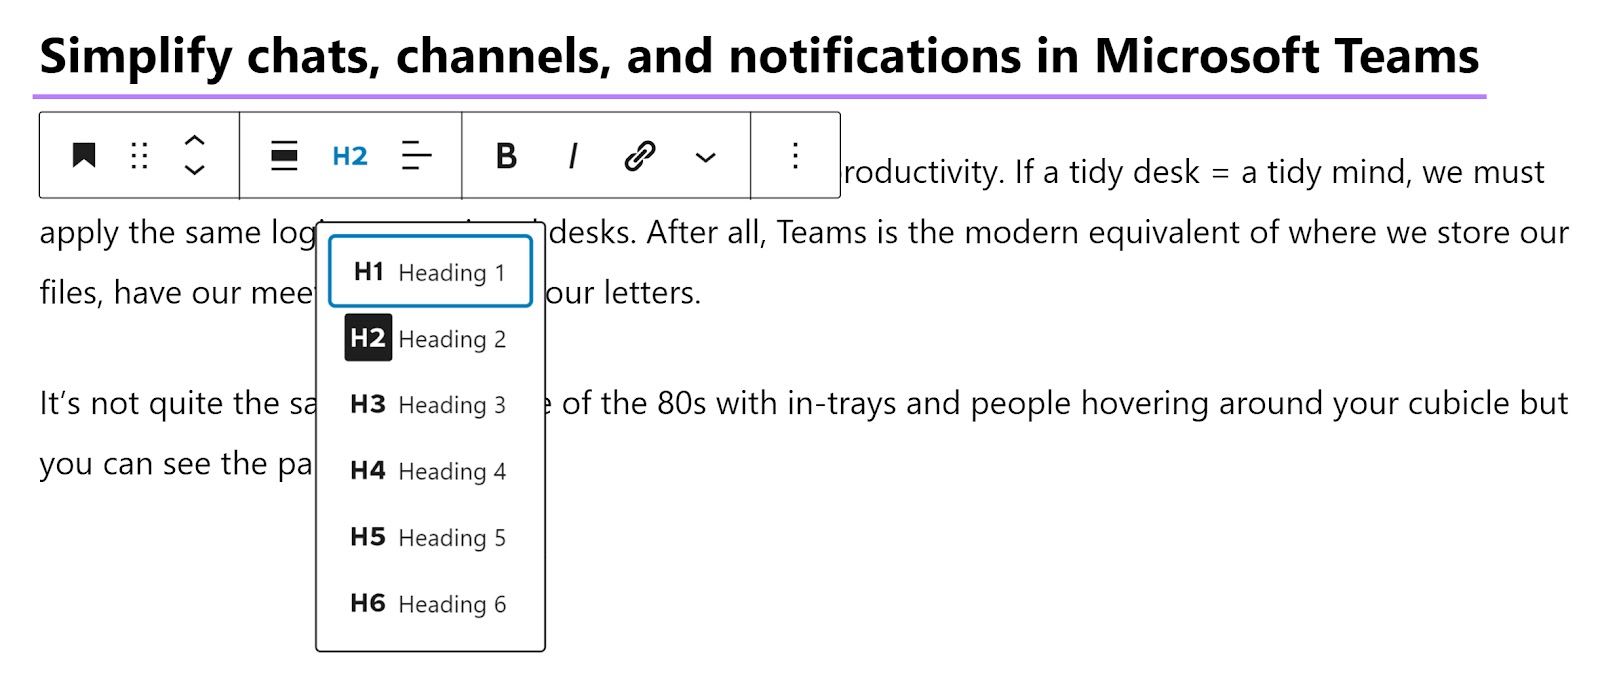
Many CMS automatically create an H1 from your webpage title. And allow you to easily select headers (like H2s, H3s, and H4s) from the editor without having to update the HTML.
H2s introduce each primary section on a webpage or blog post.
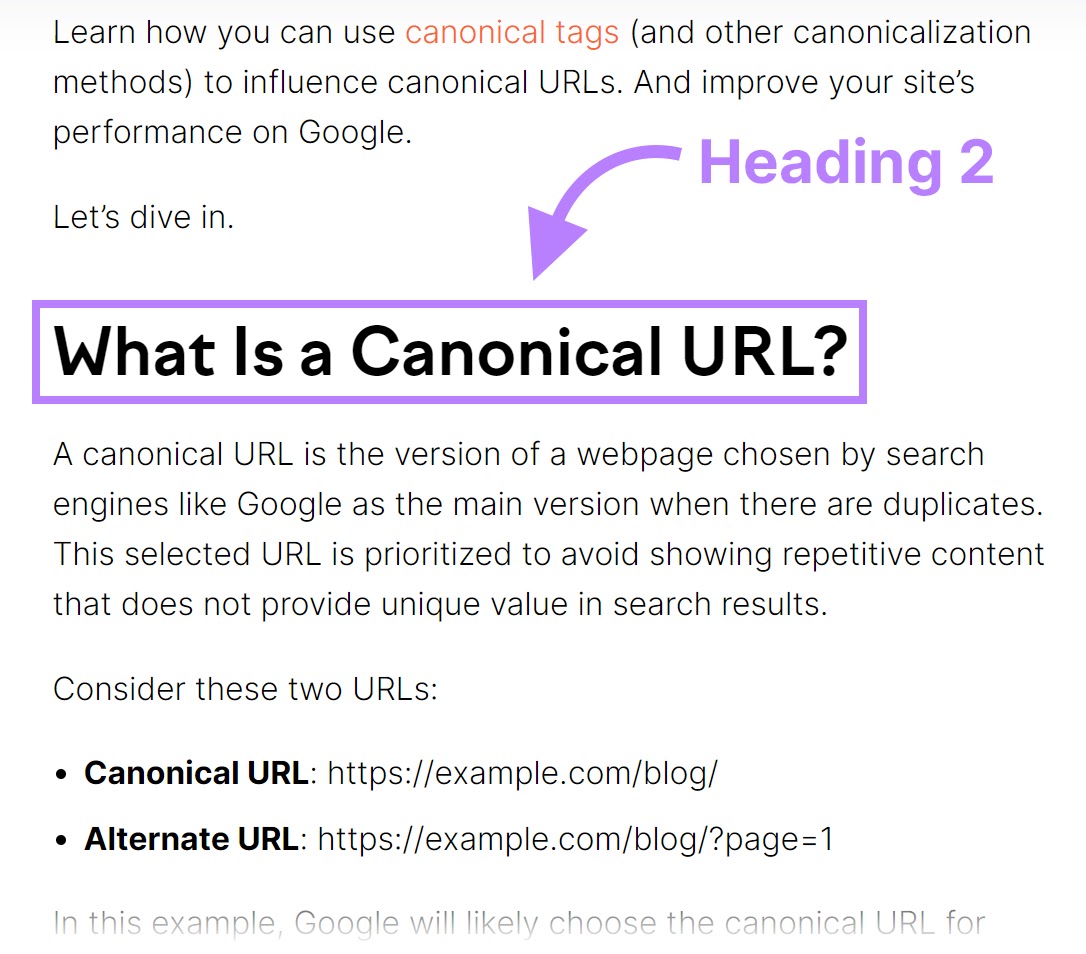
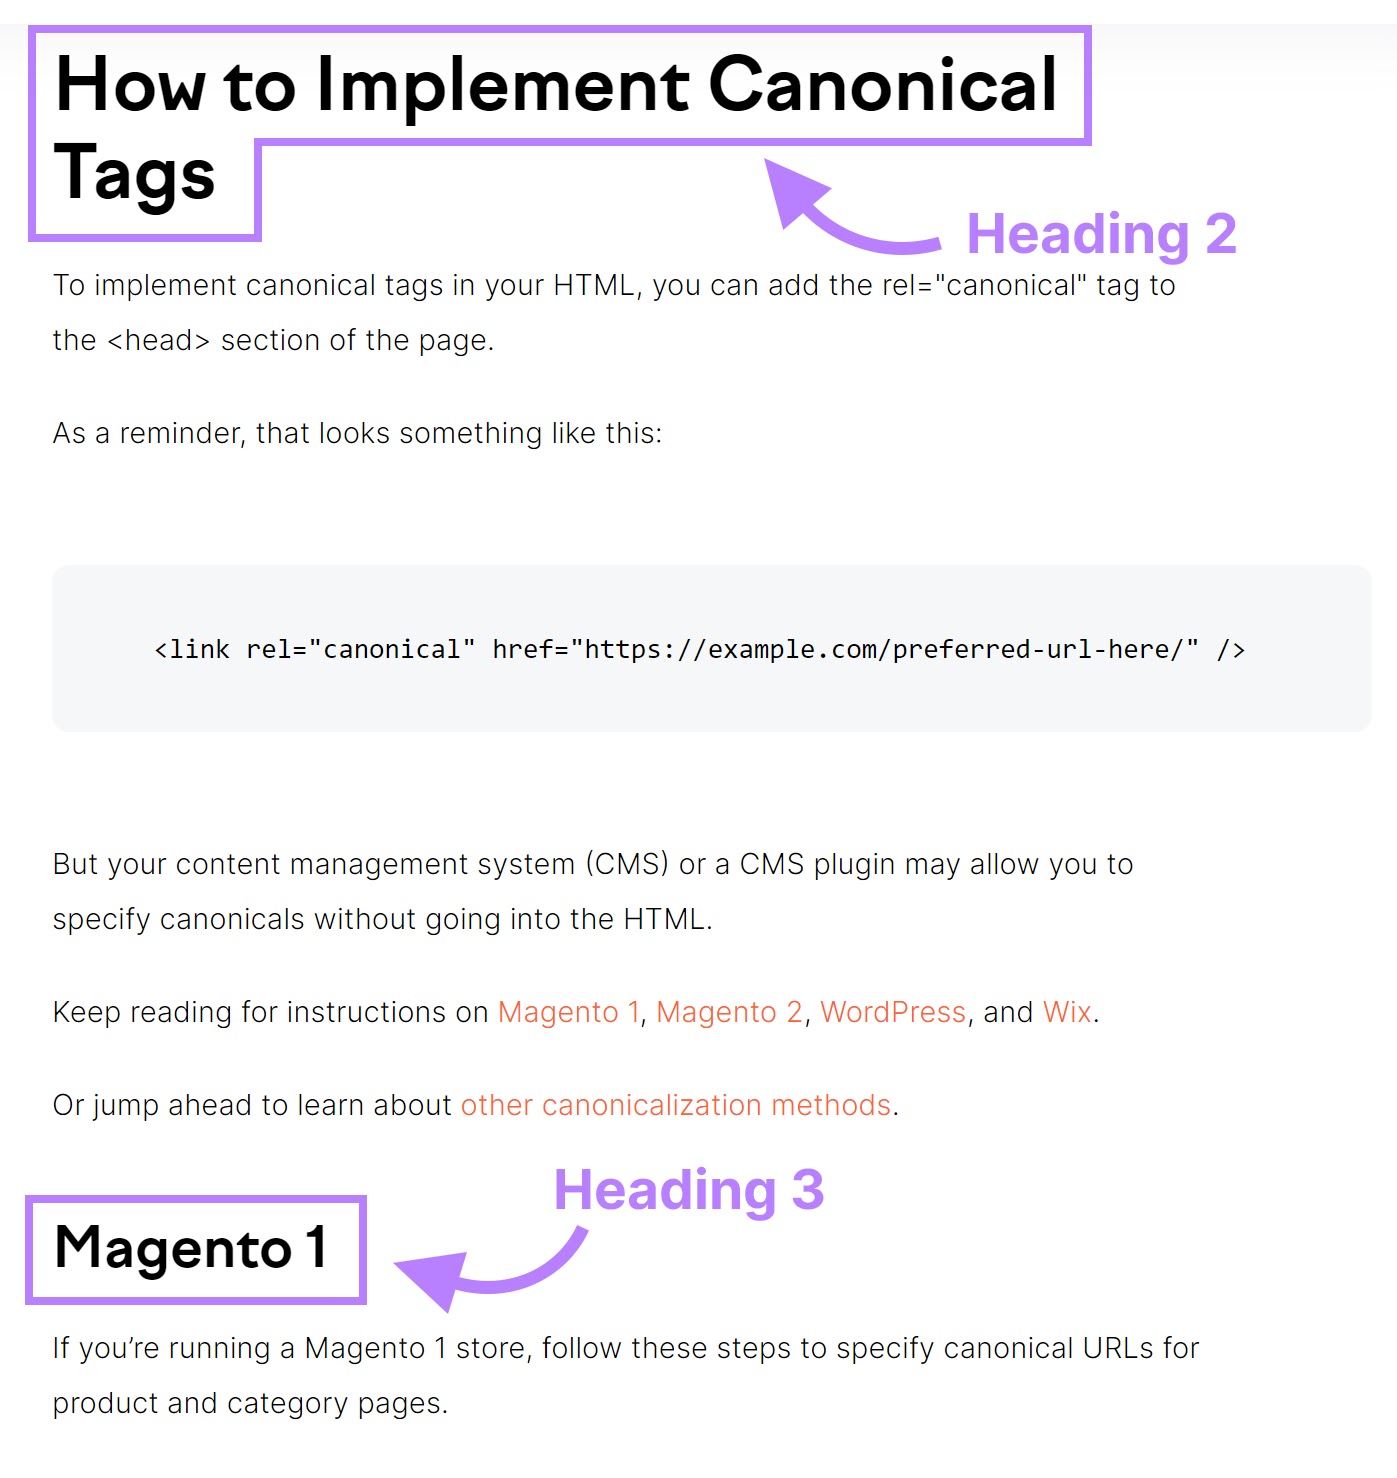
H3s come after H2s. Use them to organize content underneath an H2. And improve readability.
H3s appear smaller in text size. Indicating subsections within your H2.
In a CMS like WordPress, use the editor to choose header tags.
4. Image Alt Text <img>
Alt text, or alternative text, is a description that corresponds to an image. If the image won’t load, the text displays in place of it. The text is also helpful for those who use screen readers.
Here’s an example of an image HTML tag:
<img src="https://example.com/.pixel-7-pro-camera-barjpg" alt="The back of the Pixel 7 Pro showing the aluminum camera bar">
“Img src” indicates the image source. And (alt) indicates the image’s alt text.
Here’s what alt text looks like when an image fails to load:
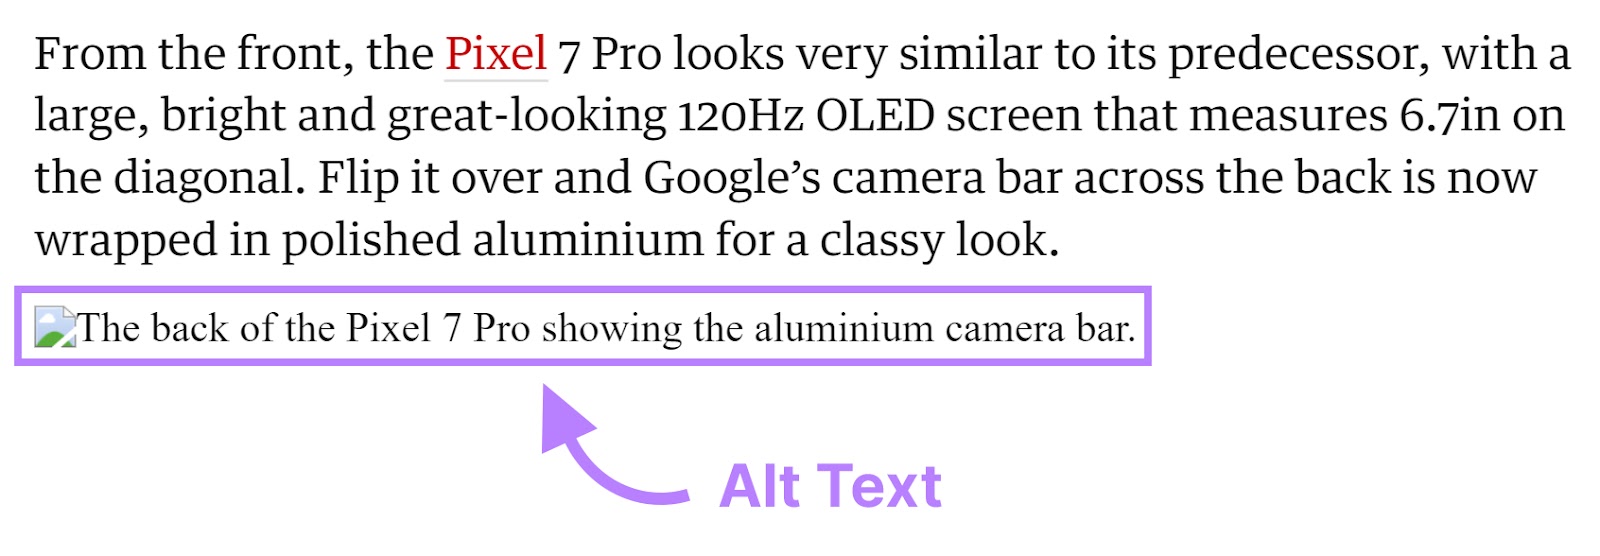
Image alt text is important for SEO because it provides search engines with information about the image’s content. Which can help improve the page’s relevance.
Optimizing your images can also drive traffic and improve your chances of ranking.
Every image you add to your website is an opportunity to strategically add keywords and phrases. Further optimizing your content for search engines.
In many CMS, you can apply alt text without using an HTML editor.
A canonical tag allows you to specify the preferred version of a page when multiple versions of the same page exist.
For example, let’s say you operate an ecommerce site. Each color variant of the same product has a unique URL. But the content is the same on each page. Use canonical tags to indicate which URL you prefer Google to index.
Canonical tags are important for SEO because they help prevent duplicate content issues. Which may negatively impact rankings. Search engines can understand which version of a page to index and display in search results.
These tags tell search engines which page version (known as the “canonical URL”) it should index. As a result, repetitive content won’t display in search results. And any page authority will go to the canonical URL you designated.
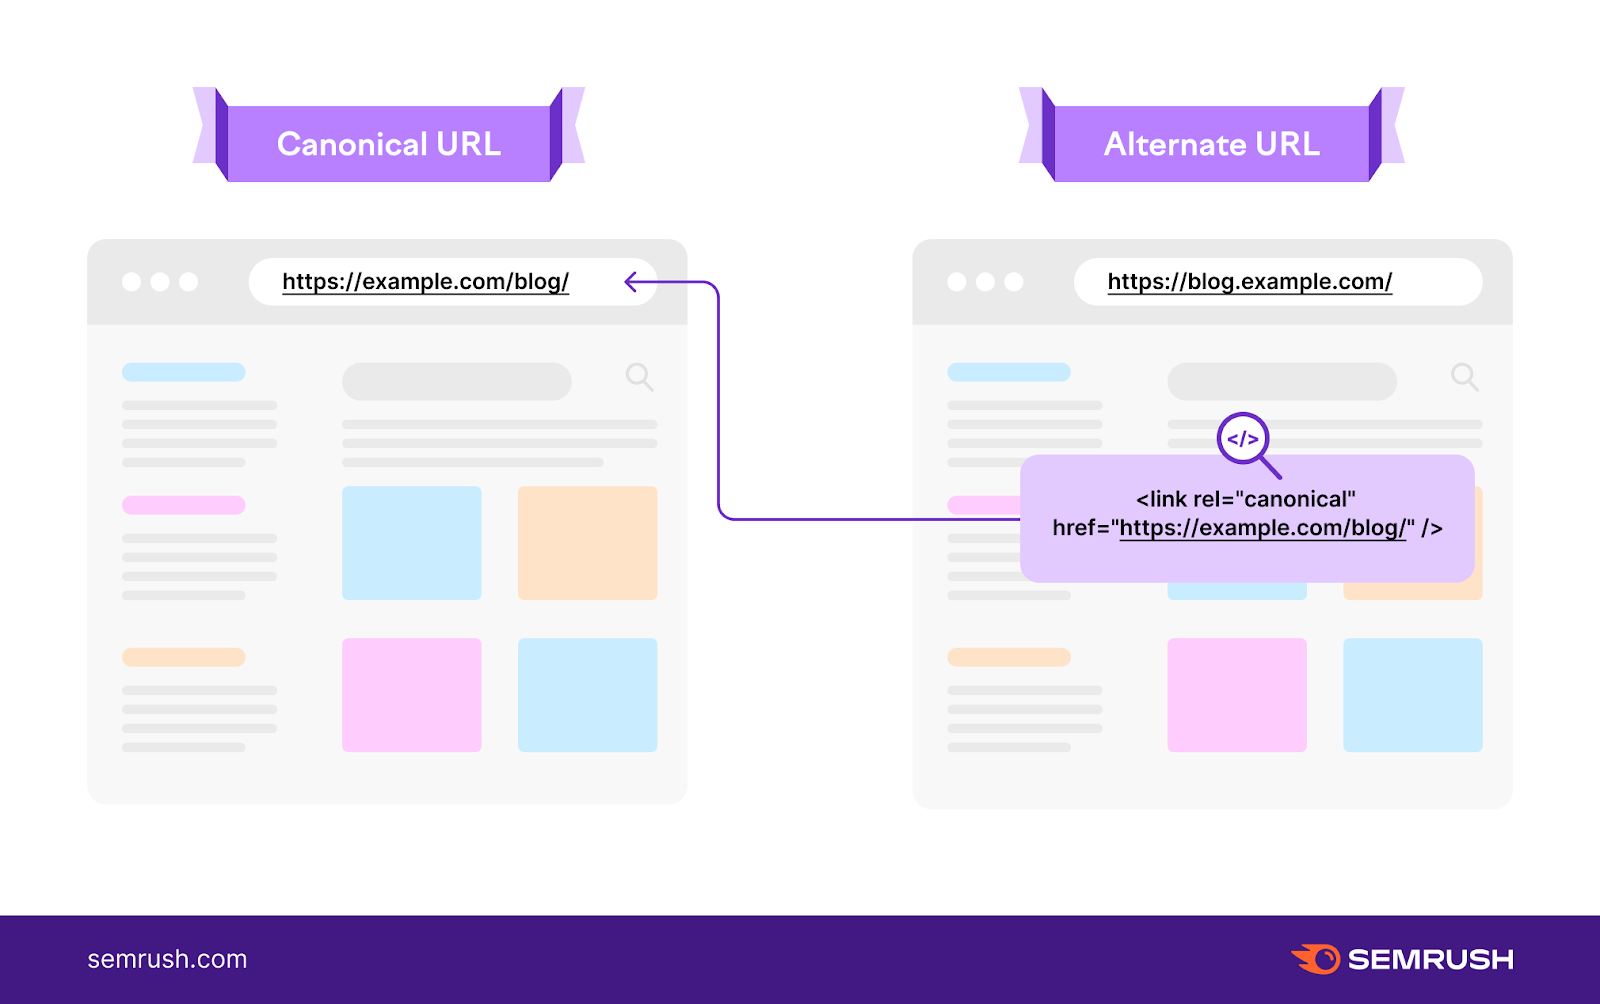
To add a canonical tag, use the code snippet:
<link rel="canonical" href="https://example.com/preferred-url-here/" />
A canonical tag has several attributes:
- “link”: Defines the relationship between one URL and another
- rel=”canonical”: Indicates the type of relationship
- href=”URL”: Confirms the specific URL of the original content
In some CMS, like Versoly shown below, you can add a canonical URL without accessing the HTML editor.
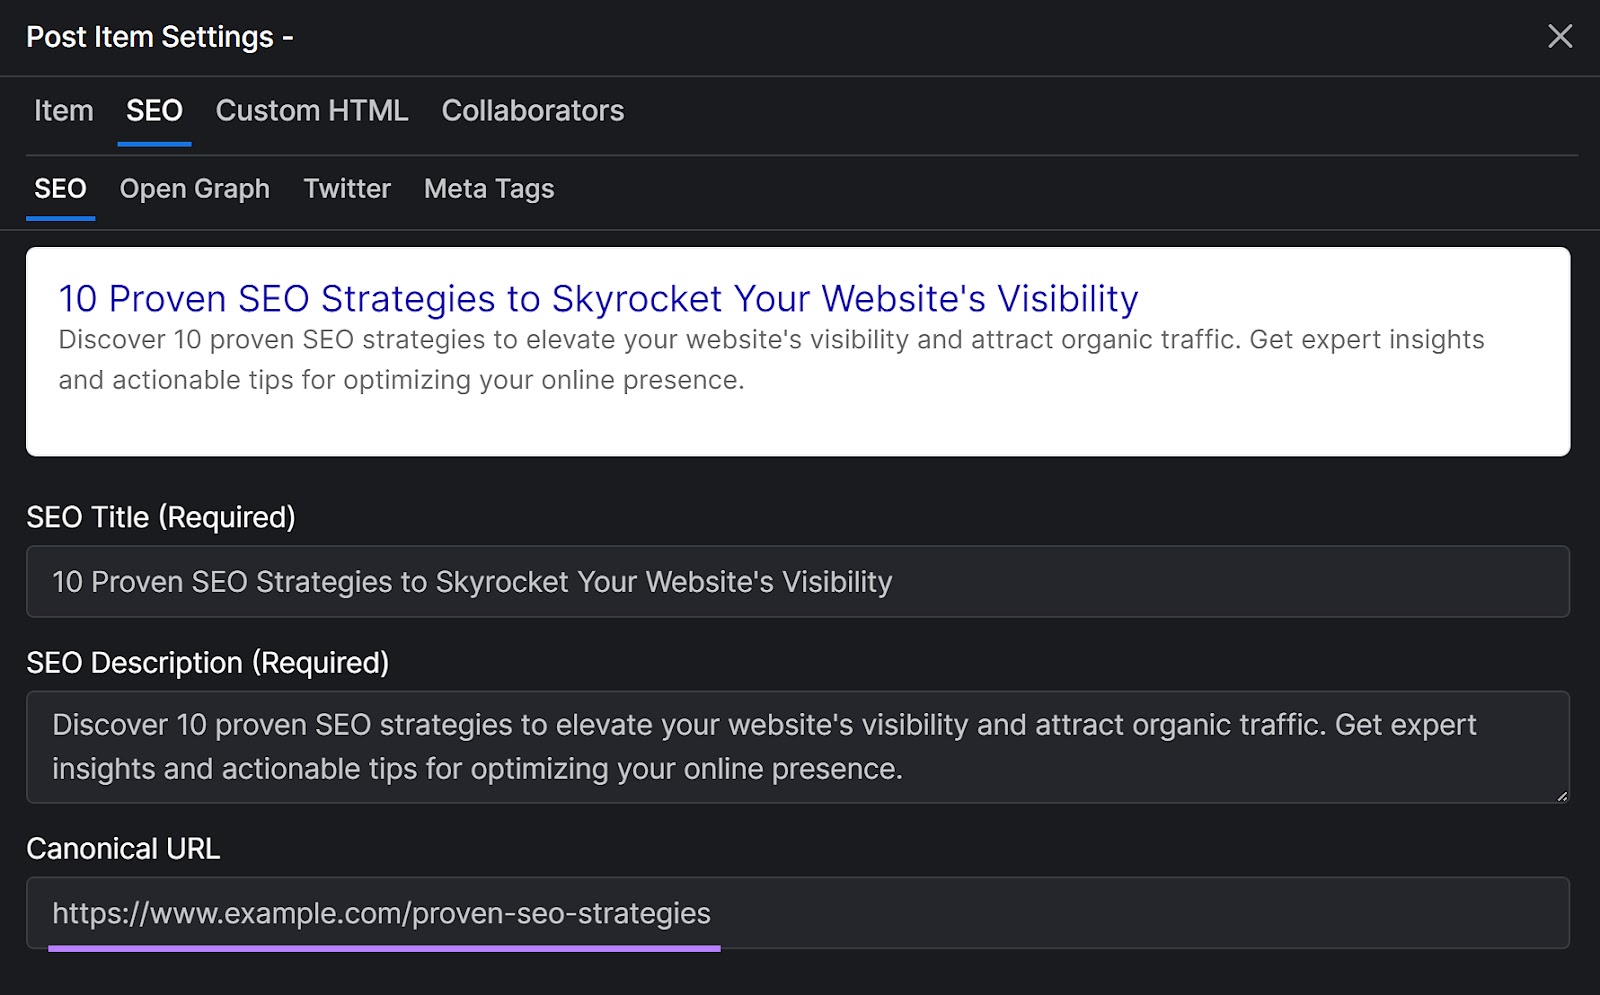
Search engines might index the wrong page if you don’t use a canonical tag. This means you might not rank as highly as you could for your preferred page.
You might not want search engines to index every page of your site. Combining robots meta tags with directives like “noindex” or “nofollow” helps search engines crawl and index your site optimally.
A robots meta tag is a page-level tag that tells search engines and website crawlers how to crawl your site.
Use the robots meta tag to specify whether a page should be indexed by search engines. And whether links on the page should be followed.
Common pages where you might include this tag include:
- Admin or login pages
- Confirmation pages. Such as thank you pages.
- Internal search result pages
- Pages from your staging site
- Pages with duplicate content
- Pay-per-click (PPC) landing pages
As an example, you might include the following code snippet in your HTML header if you don’t want search engines to index a page:
<meta name="robots" content="noindex">
The two attributes are “name” and “content.”
- Name: Indicates the type of metadata being defined (robots)
- Content: The instruction given (no index)
You can also use multiple instructions within the content attribute. Such as noindex, nofollow, and noimageindex, among others. Use a comma to separate each one.
Here’s an example of using multiple instructions:
<meta name="robots" content="noindex, nofollow">
The noindex directive tells search engines not to include the page in search results. The nofollow directive tells crawlers not to follow the links on the page.
7. Schema Markup
Schema markup is a type of structured data you can add to the source of a page to help search engines understand the content.
Site owners often use this data to provide additional information about the page. Such as product details, reviews, ratings, and much more.
Here’s an example of markup on the Semrush homepage:

While schema markup isn’t technically an HTML tag, it’s still valuable. It can help improve the visibility and relevance of your page in search results. So it stands out with rich snippets.
Common rich snippet formats include but aren’t limited to:
- Product markup
- FAQs
- Reviews
- Recipes
- Movies
- Events
No matter your business type, using markup can enhance your content’s appearance in the SERP and improve your click-through rate. People are more likely to notice and click on the listing.
Let’s say you operate a bakery, and your website has a section for recipes. By adding schema markup for a recipe page, the search results for your recipe pages can display differently than standard organic listings. In the markup, you can include details like ingredients, prep time, and cook time.
Here’s what rich snippets for recipes look like:
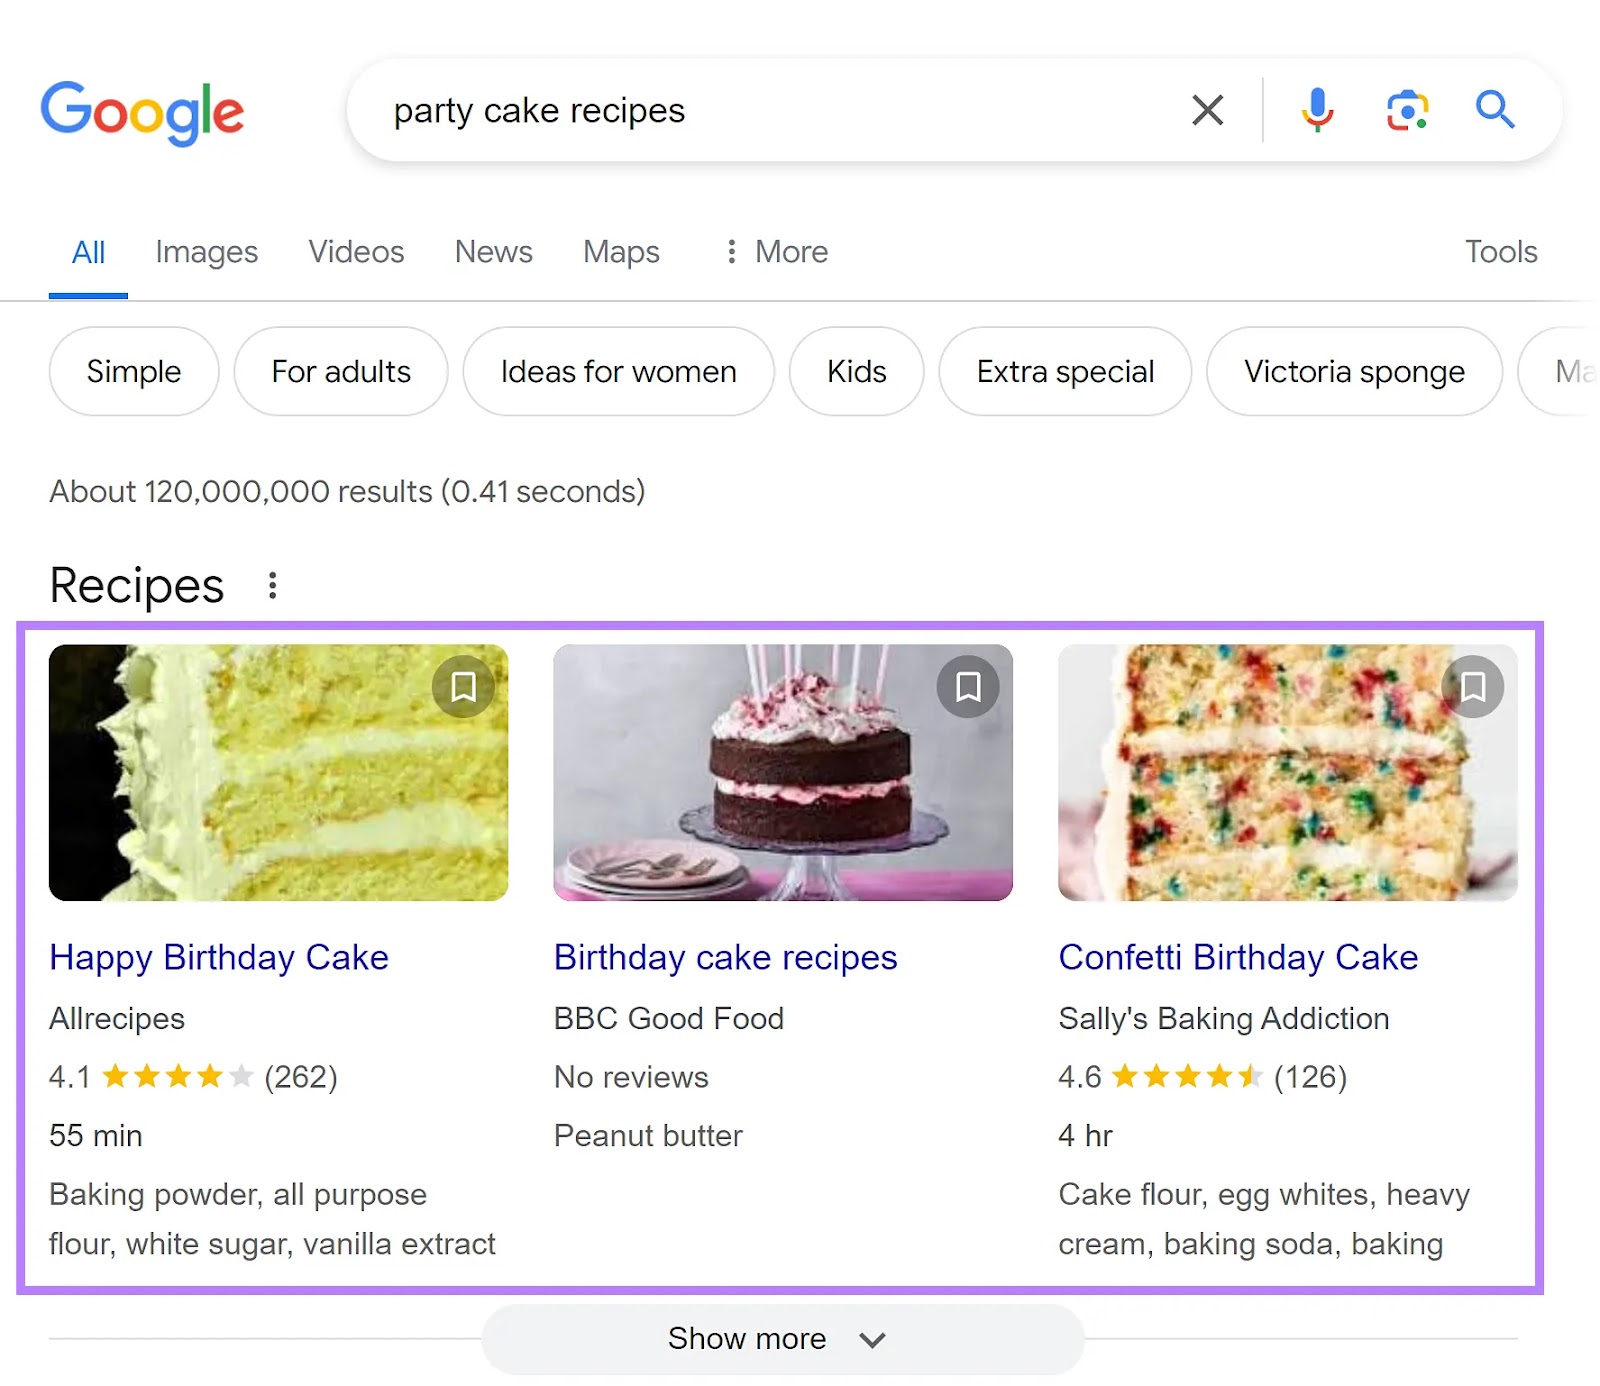
Use Google’s Structured Data Markup Helper to add schema markup.
Open the tool. Select the snippet type you want to create, and enter your page URL. Then, click “Start Tagging.”
For this example, we’ll create product-structured data markup.
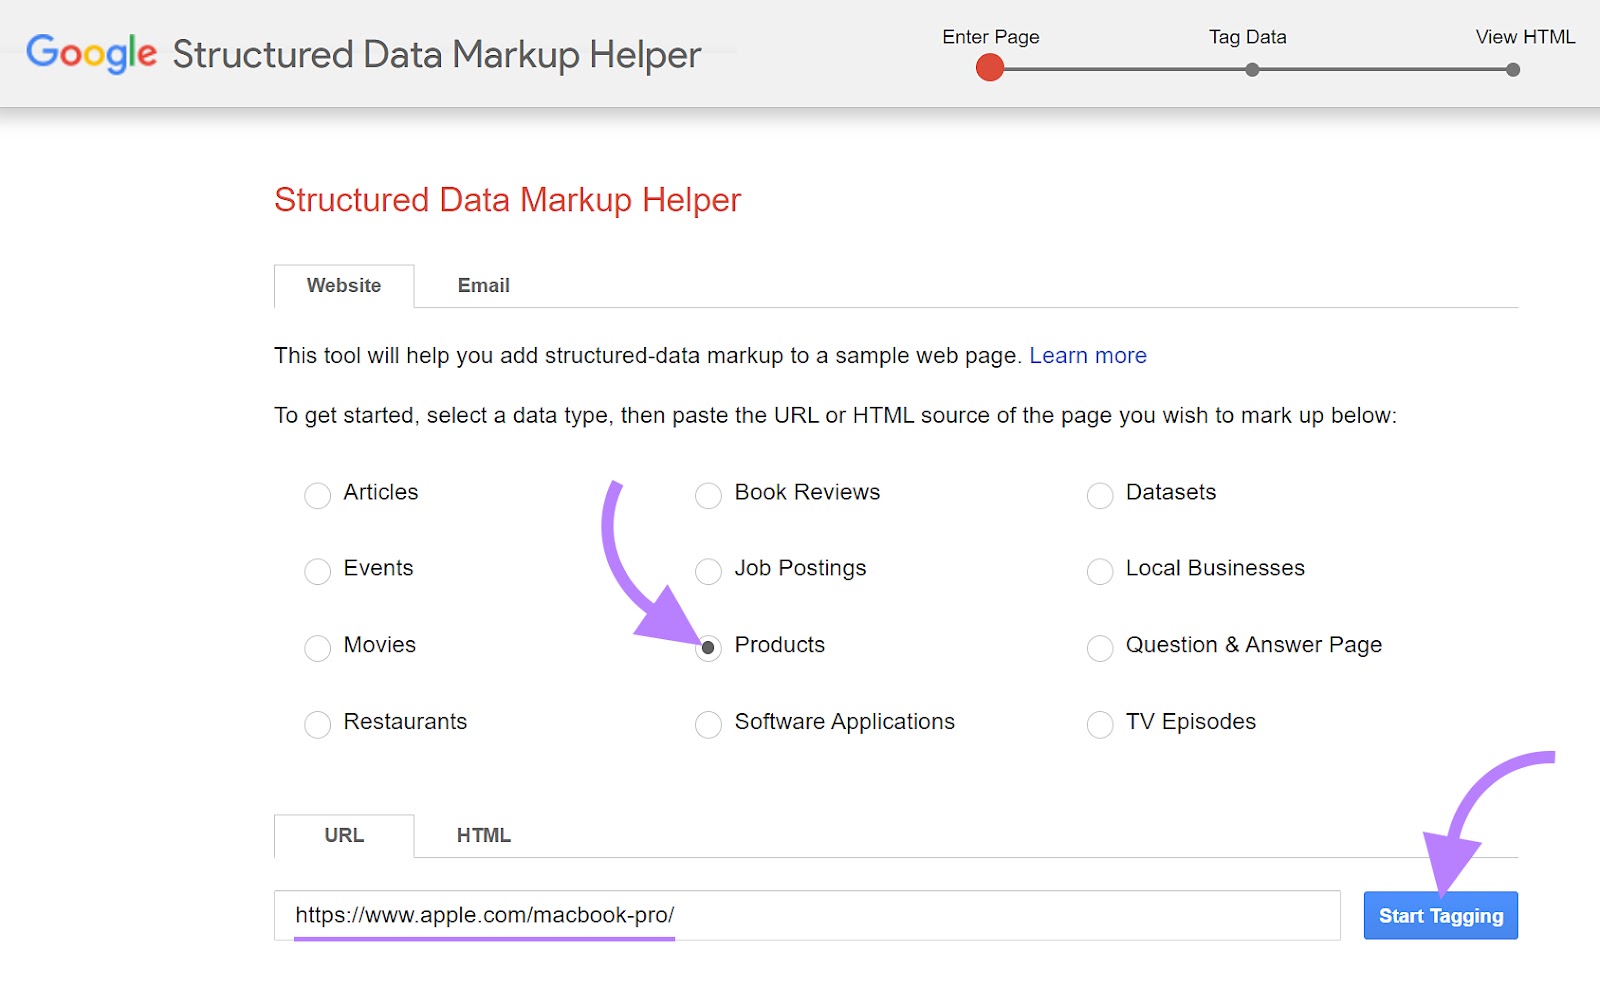
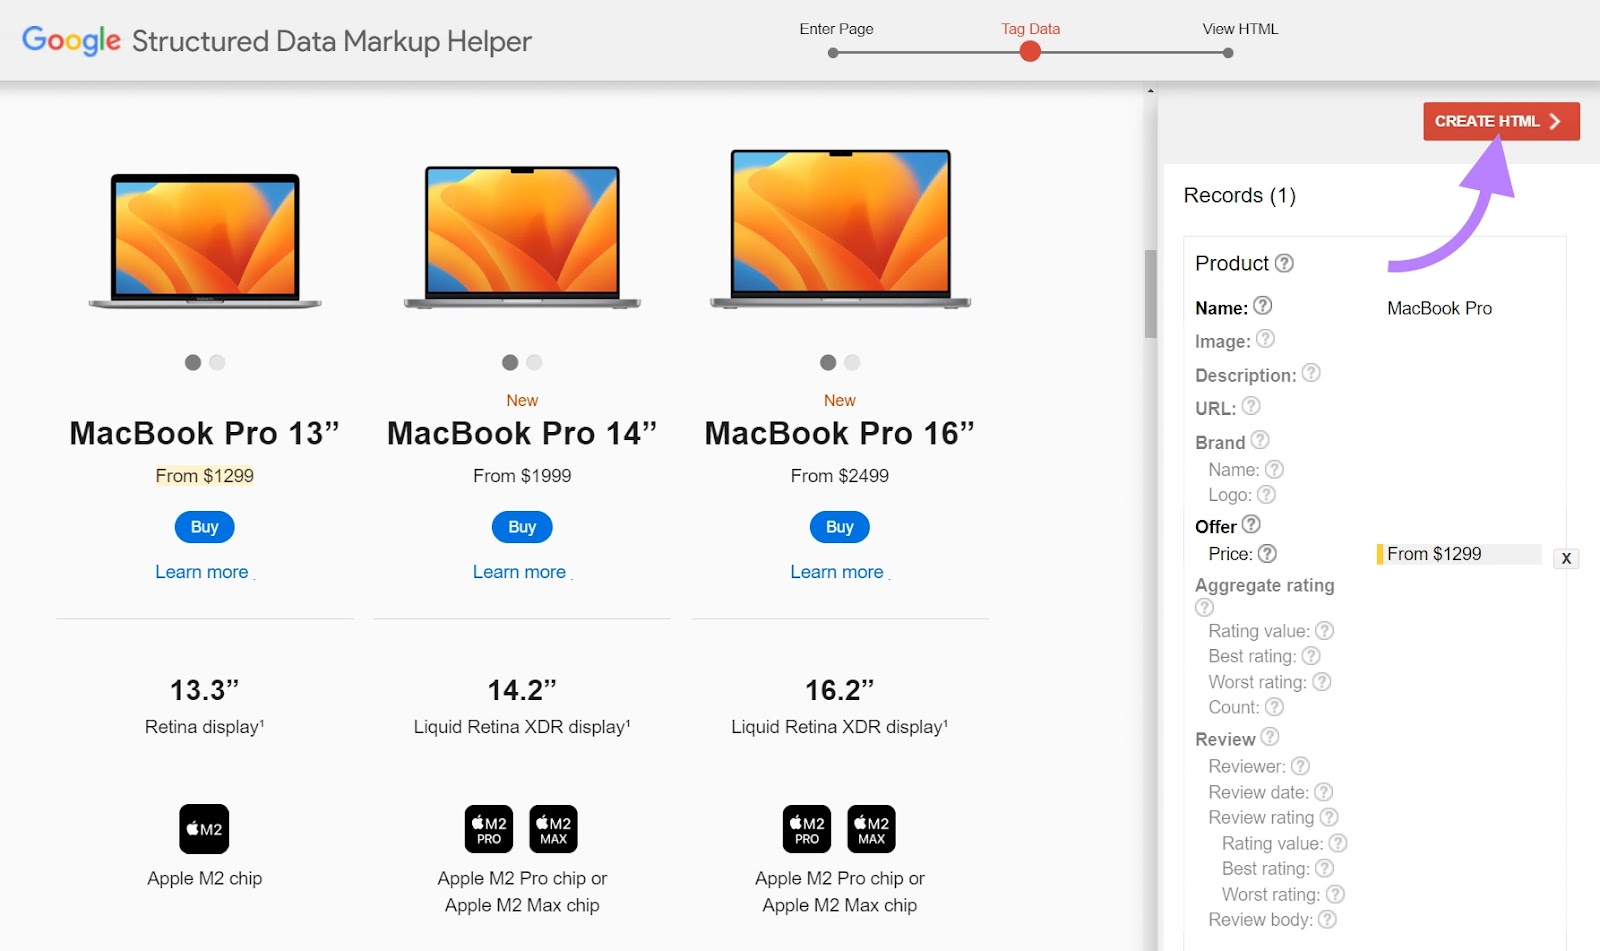
The tool will populate the webpage’s URL into the “Tag Data” view:
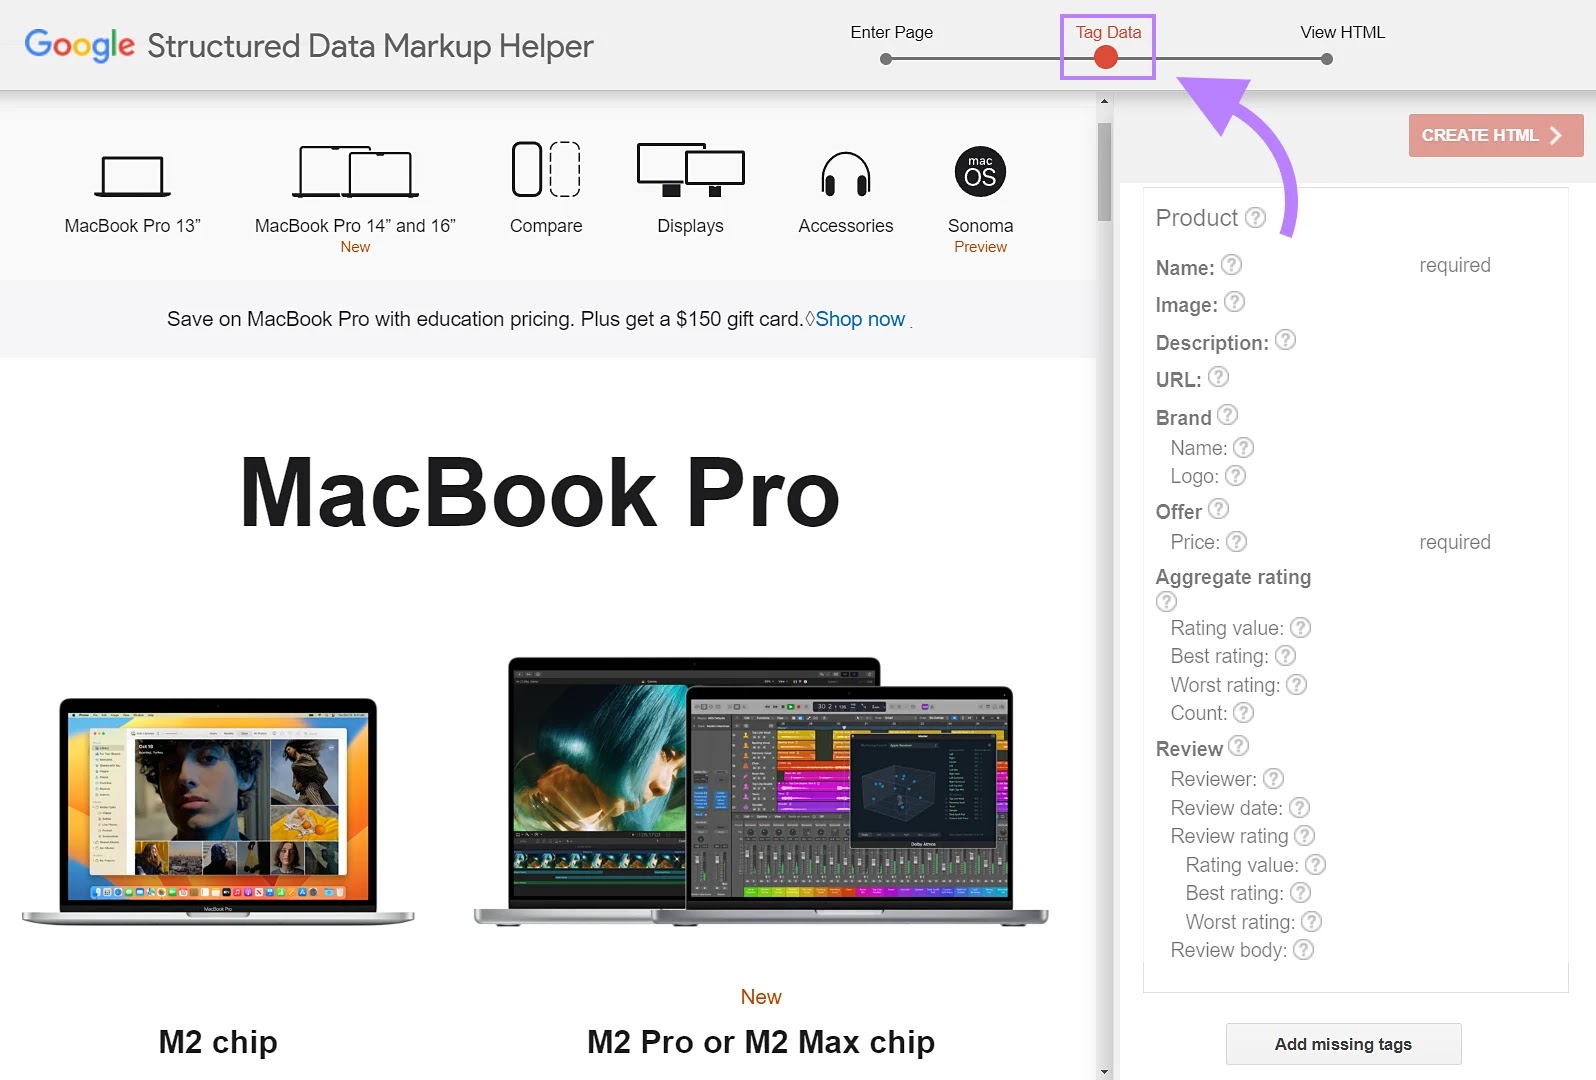
This example is a product snippet for MacBook Pro. So, we’ll include elements like the product’s name, price, image, brand, logo, etc.
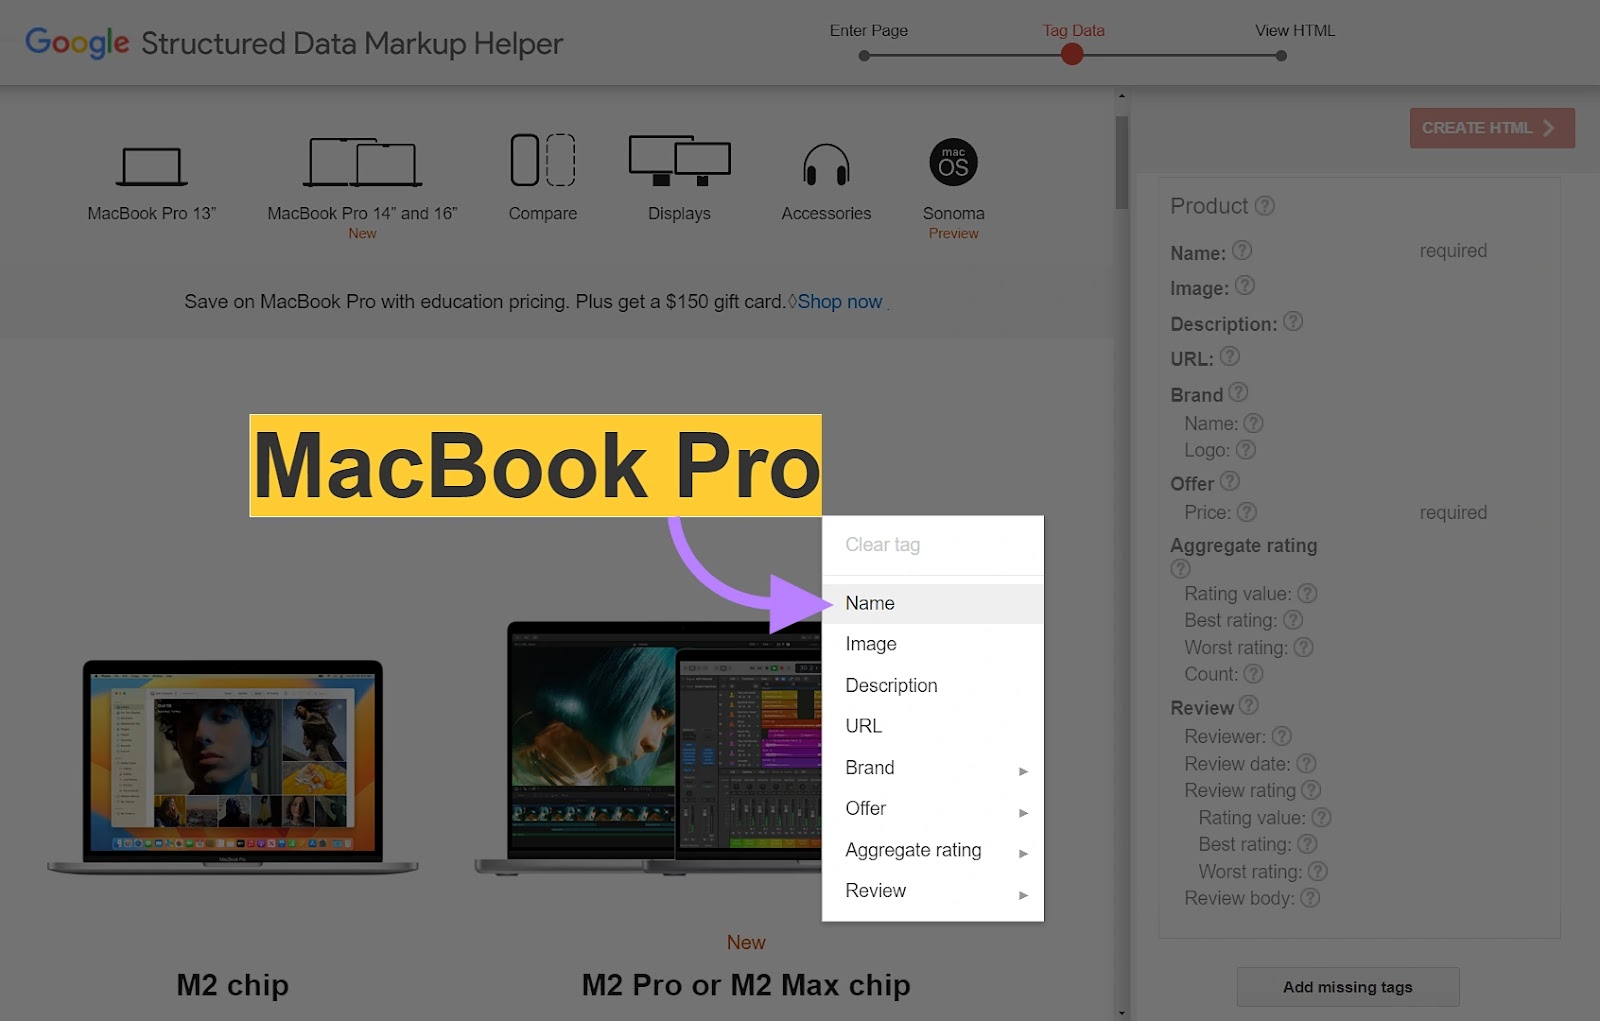
Choose or highlight page elements, and the tool will ask you to tag them.
For example, to add the product’s name, highlight it and tag it with “Name.”
If you wanted to add the price, you would highlight and select the “Price” tag:
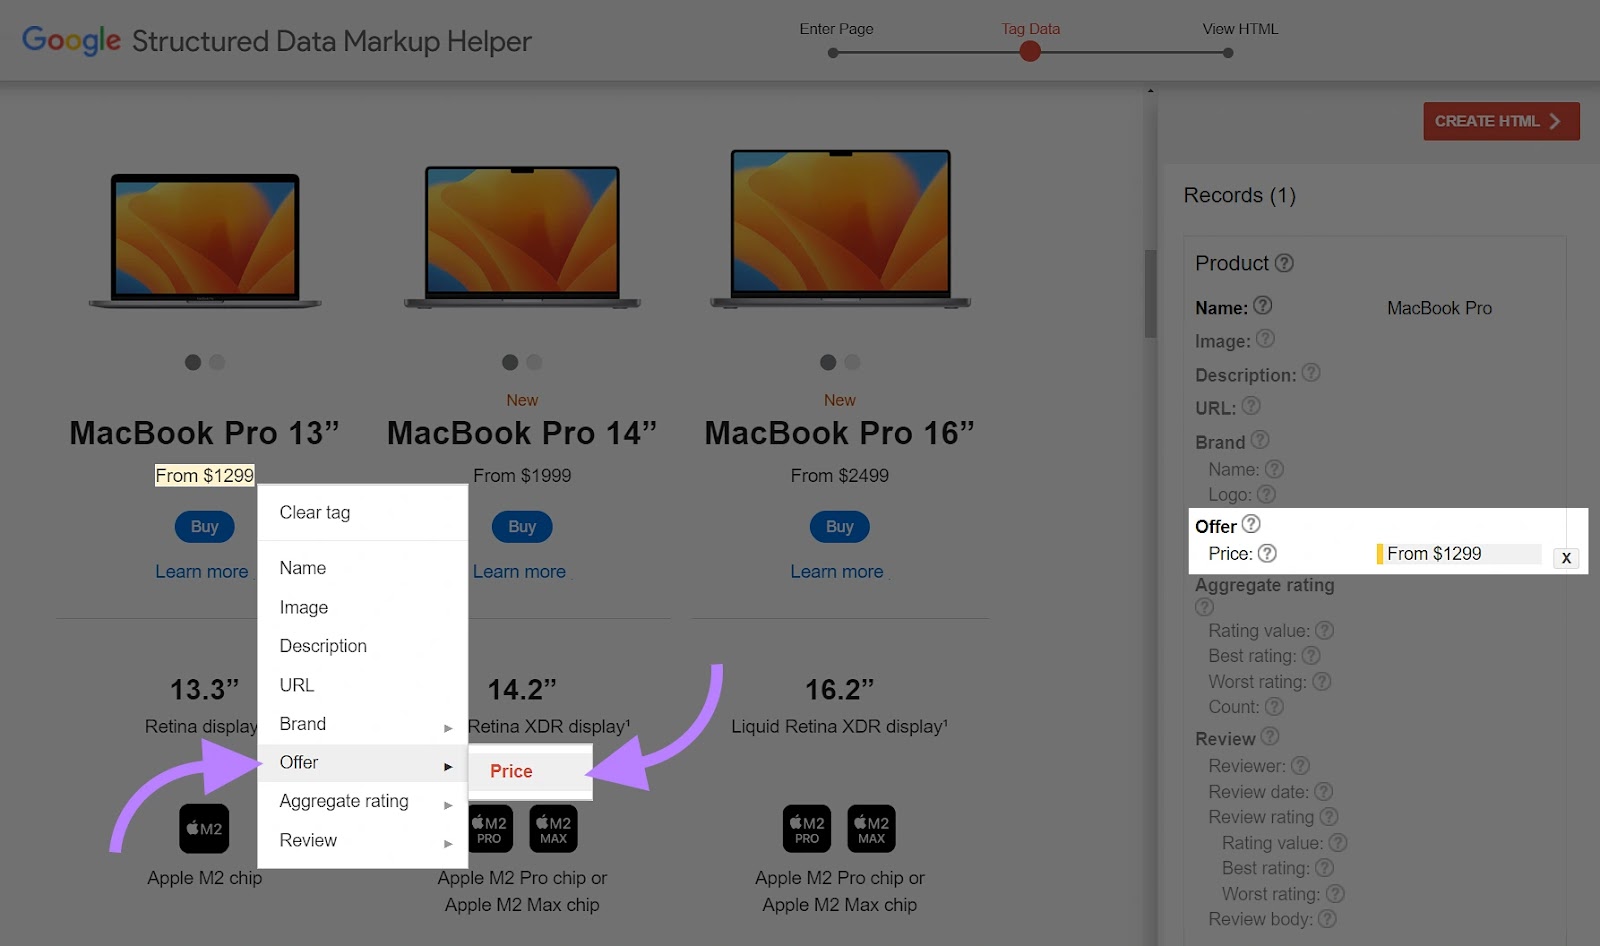
As you work, the tool adds all the information to the right-side panel.
Tag as many elements as you can.
Then, click the red “Create HTML” button at the top-right of the screen.
The tool will create a structured data markup code in the side panel.
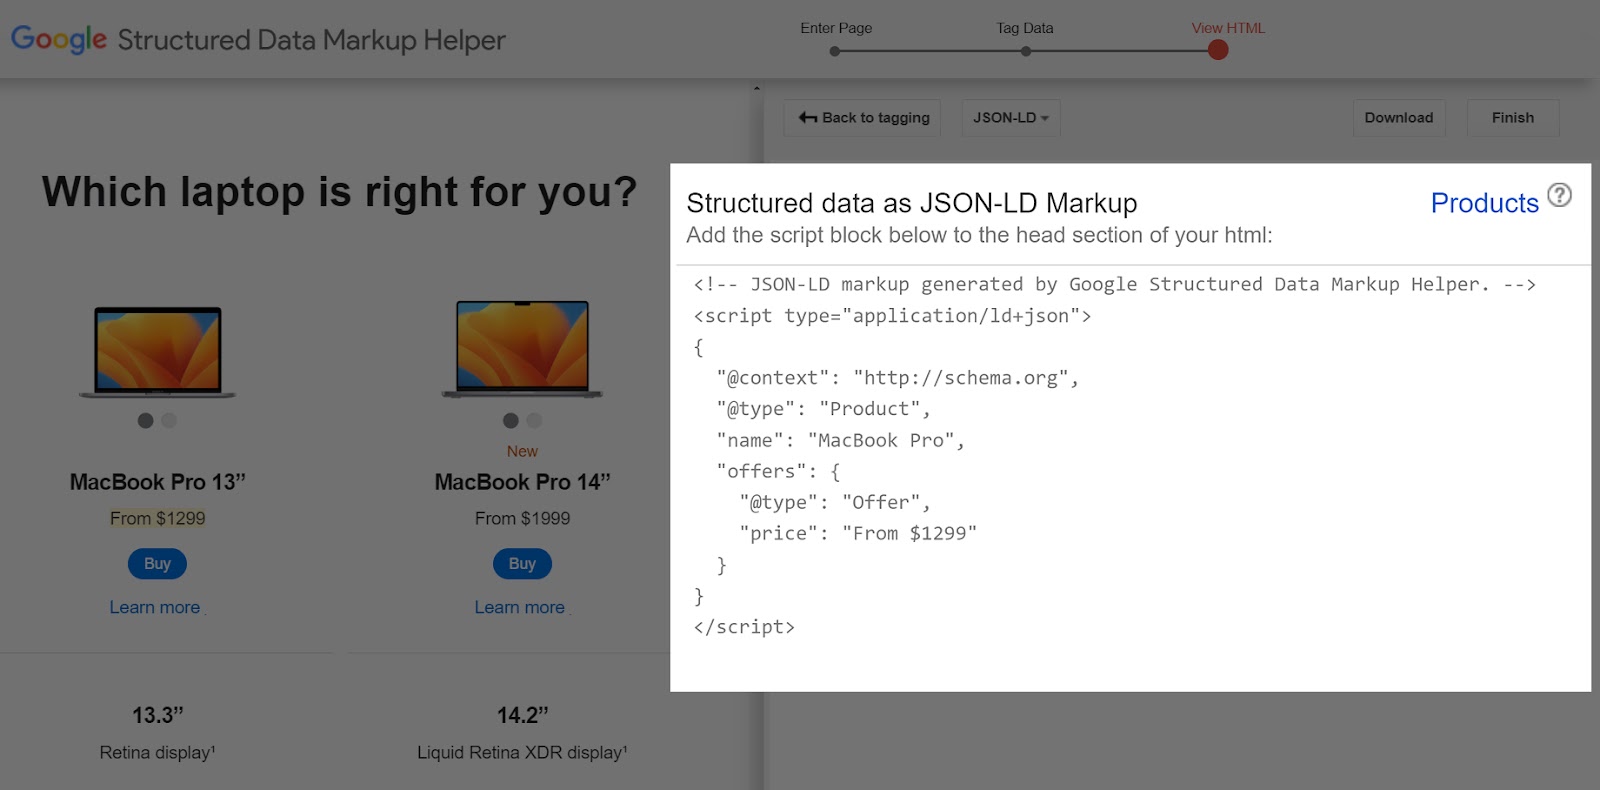
Finally, copy or download the code and add it to your page’s <head> section.
That’s it. You successfully added schema markup.
8. Table <table>
A table tag is an HTML element used to create tables on webpages.
While adding tables to your content may not sound like a typical SEO tactic, you can use them to organize and display data in a structured format. This can enhance the look and feel of your content. Making it easier to read.
Use table tags to create rows and columns (tables) inside your content to present data in a structured and visually appealing manner.
For example, this Sizely table displays jacket sizes by country. Which is helpful for shoppers.
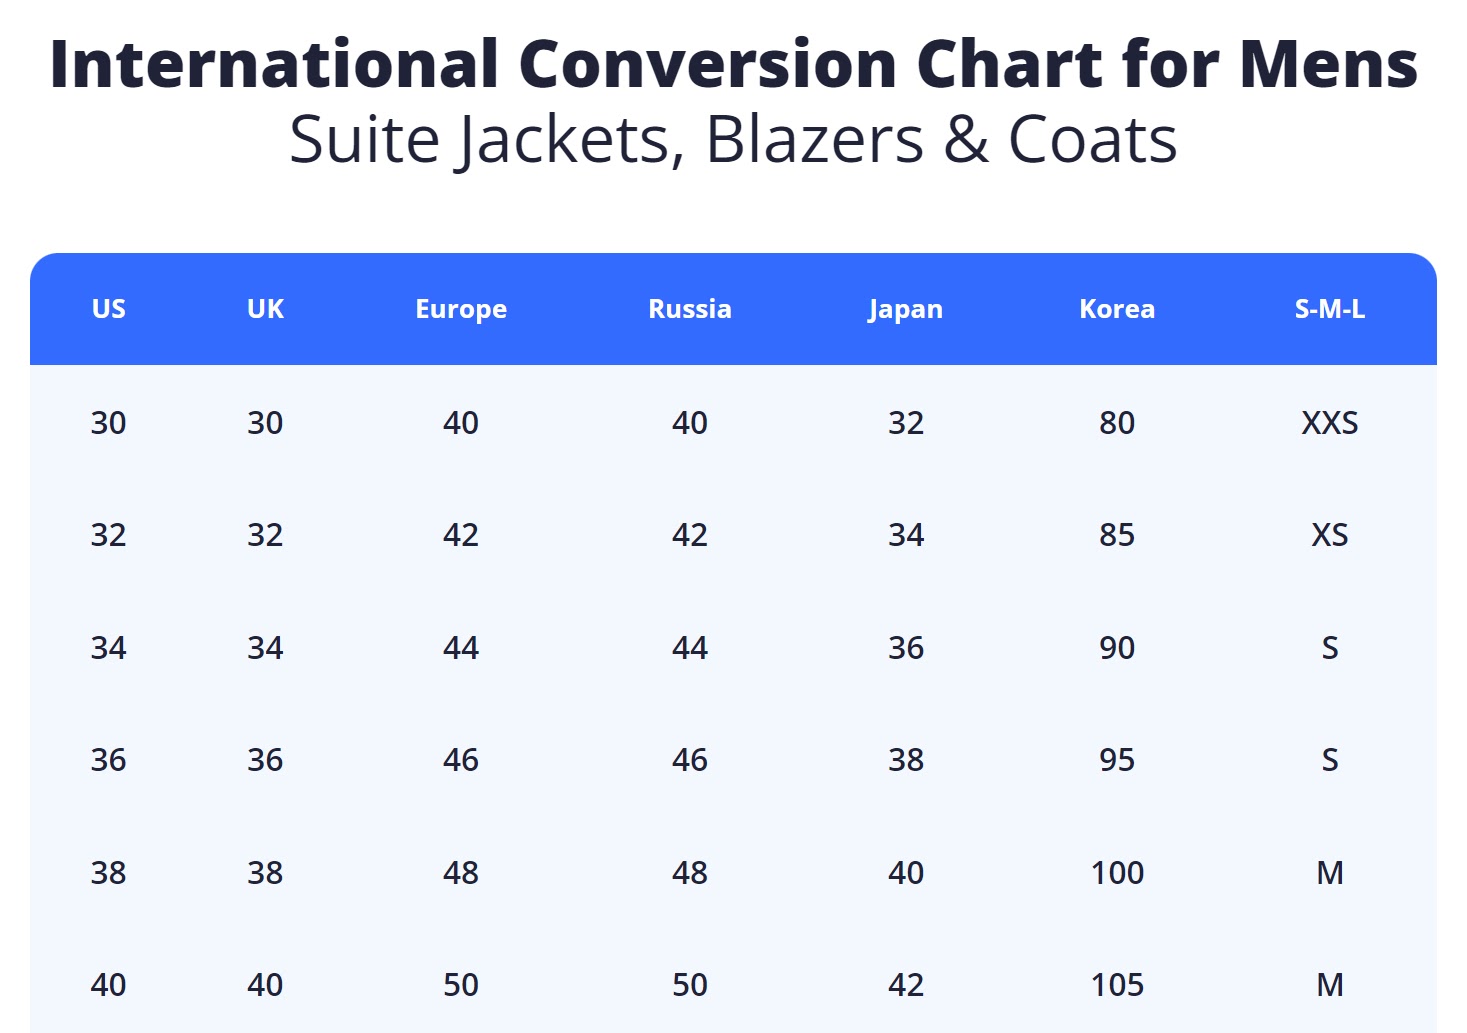
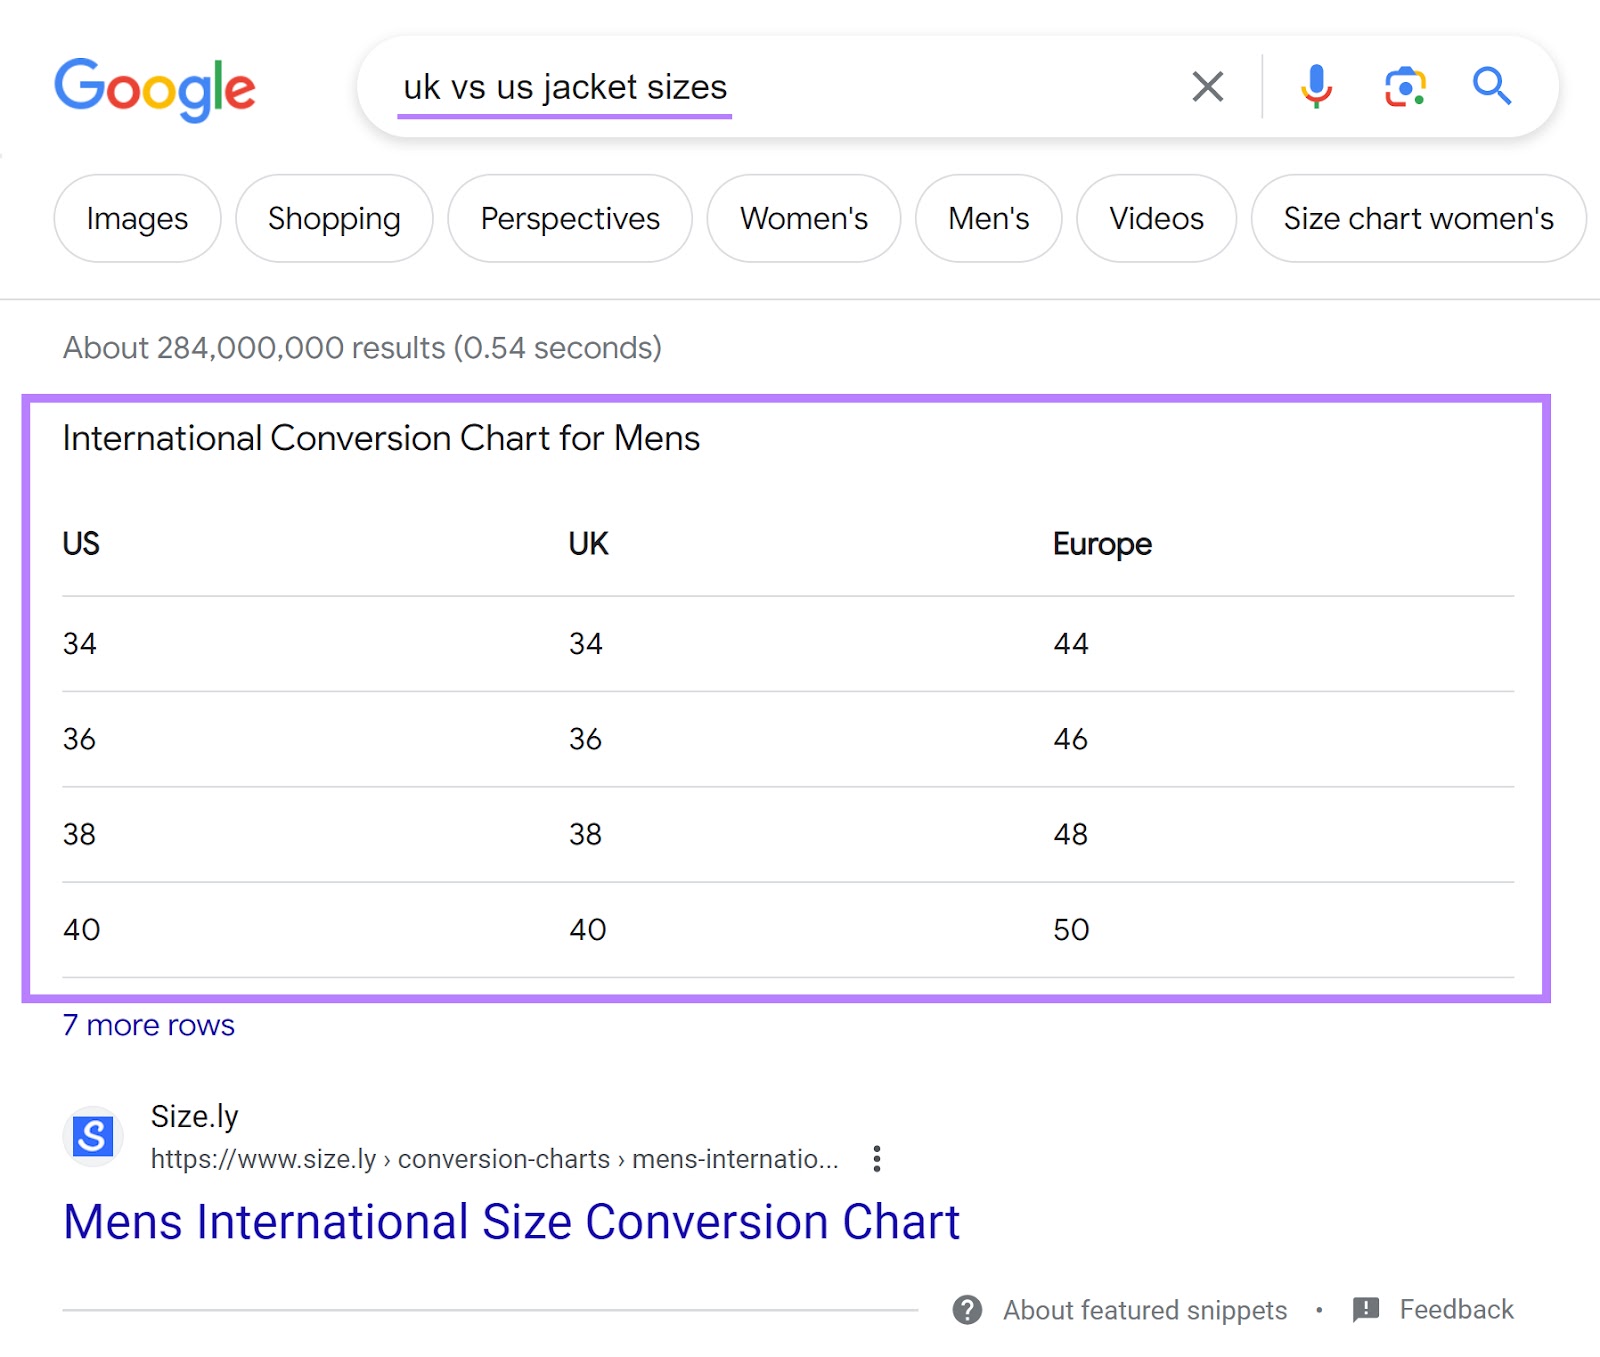
Tables have the potential to appear as featured snippets in Google as well. Which can draw attention. And generate more website clicks.
If your CMS supports copying and pasting tables from other software like Google Docs or Microsoft Word, you may not need to worry about creating specific tags around your copy.
The key table tags to note are:
- <table>: Denotes the start of a table
- <tr>: Defines a table row
- <td>: Defines a cell in a table
- <th>: Defines a table header cell
- <td>: Defines data cells for the first row
An example of this might look like:
<table>
<tr>
<th>Header 1</th>
<th>Header 2</th>
</tr>
<tr>
<td>Data 1</td>
<td>Data 2</td>
</tr>
</table>
In the example above, we did the following:
- Started a table using <table>
- Defined a row using <tr>
- Added a table header using <th> around header 1
- Added a table header using <th> around header 2
- Added data cells around data in our CMS
- Define a row using <tr>
- Ended the table using <table>
The output will look different per CMS. Depending on whether you apply themes or custom formatting.
9. Iframe <iframe>
An iframe (or inline frame) is an HTML element that lets you embed an HTML document inside a page. It’s like a small window on your page displaying content from another place.
Scenarios where you might use an iframe can include:
- Embedding multimedia elements. Such as videos, audio files, and animations from platforms like YouTube or SoundCloud.
- Embedding documents. Like a PDF.
- Integrating a third-party application. Such as a Google Maps widget.
- Loading content from external sources. Including social media posts from Twitter, Facebook, and Instagram.
Your basic code snippet looks like this:
<iframe src="https://example.com"></iframe>
For example, using an iframe to embed a YouTube video will display the media like this:
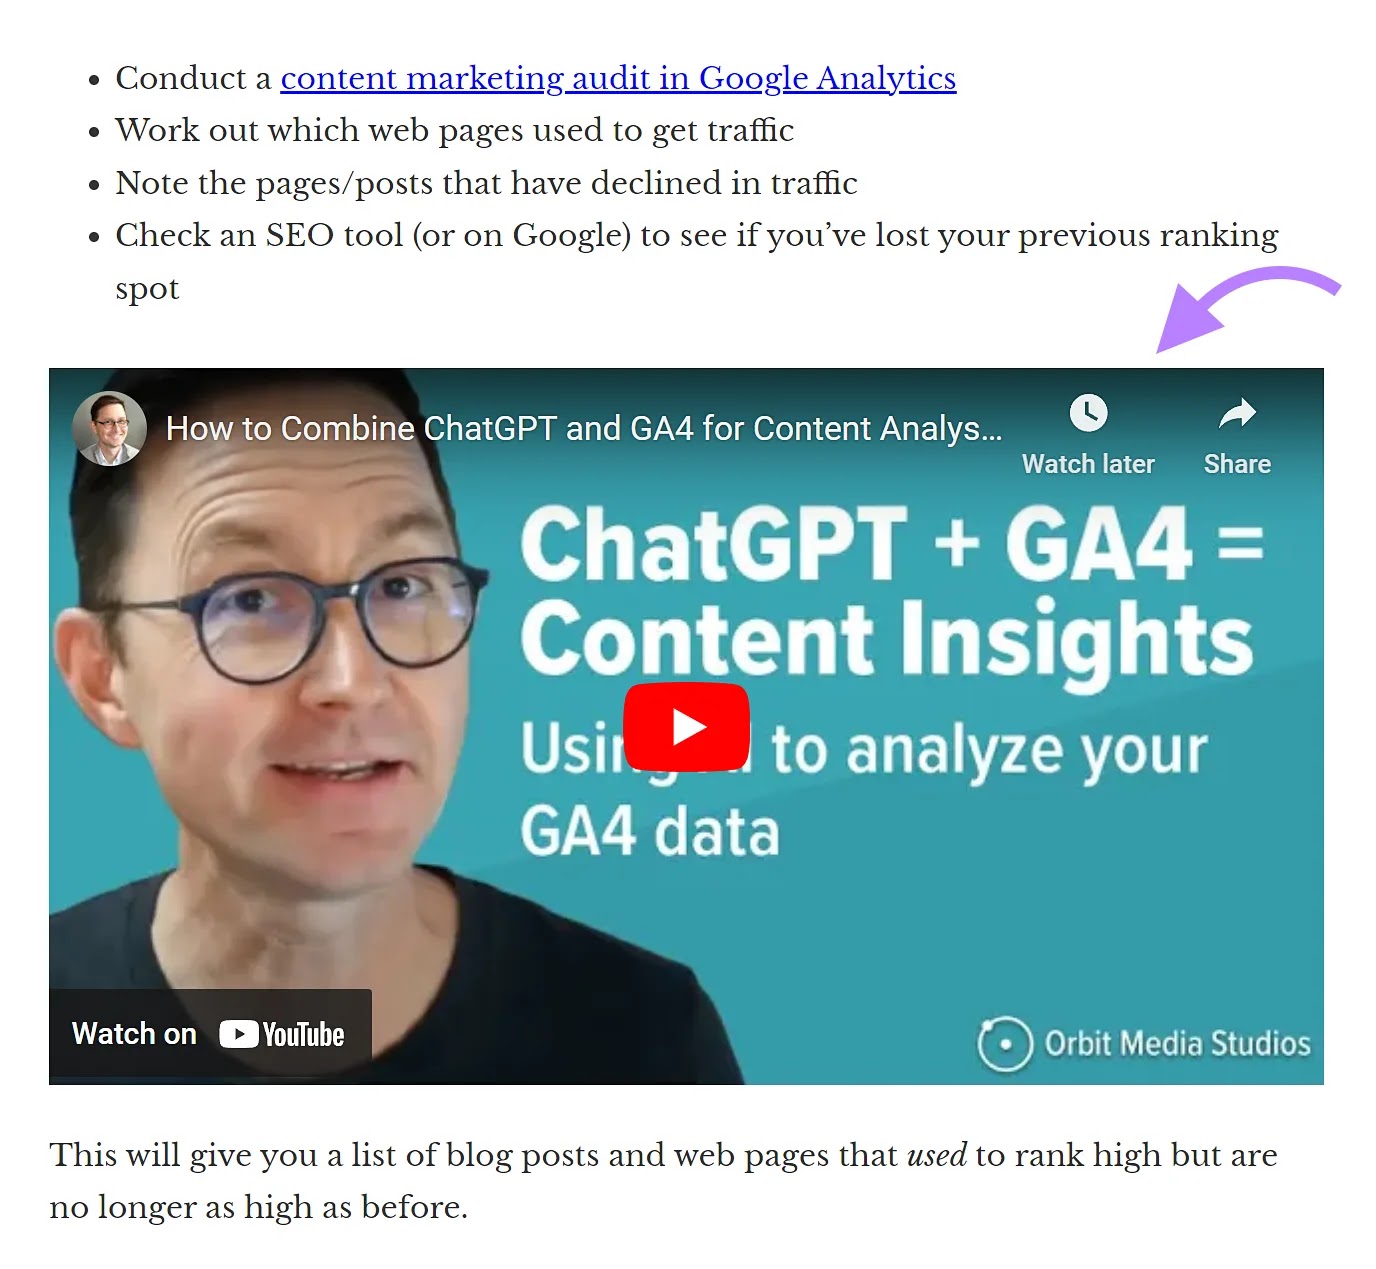
In a CMS like WordPress, you will have an embed/import button that allows you to add an external component using a URL. Rather than fetching and creating code.
For example, you can add the YouTube video URL instead of creating iframe code.
While iframes can improve the user experience, there are also cons for SEO:
- Loading an iframe means loading two sites simultaneously. Which can slow down your page. Page speed is a Google ranking factor.
- Iframes can be a security risk if the embedded content is from an untrusted source. A malicious iframe could inject harmful code on your site.
- Search engines treat iframe content as belonging to another website. Which means it doesn’t directly benefit your rankings.
We recommend the following best practices for integrating external content:
- Use iframes only for specific purposes that support the content. Such as embedding a map on your location page.
- Ensure the embedded content is relevant. And enhances user experience.
- Optimize page load times by avoiding unnecessary iframes. When you do use an iframe, optimize the page for speed to offset any load-time drag the iframe causes.
- Only integrate content from trusted sources to minimize security risks
10. List Tag <li>
Did you spot the number of lists used in this blog post?
A list tag turns text into a list. Use these tags to organize information.
When readers scan your content, they are unlikely to read every word. Lists make key points skimmable. And easier to read.
Well-formatted lists may also help with SEO.
Google shows featured snippets when it decides it provides the best user experience. One type of featured snippet is a list. Google may pull these from your content if it thinks you have the best list to support a searcher’s query.
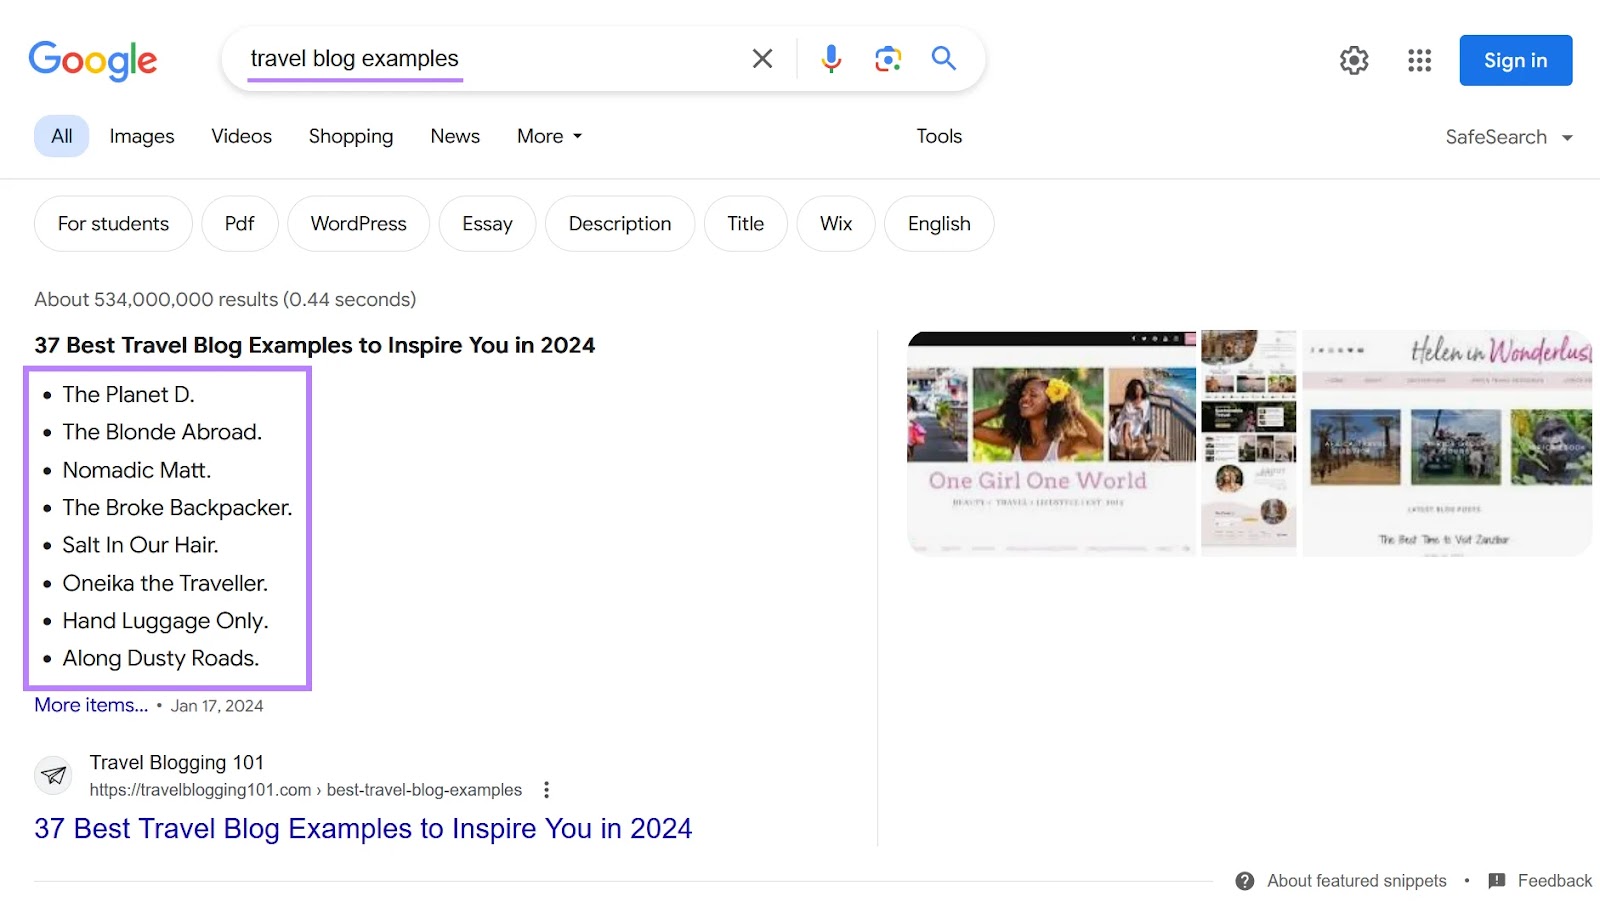
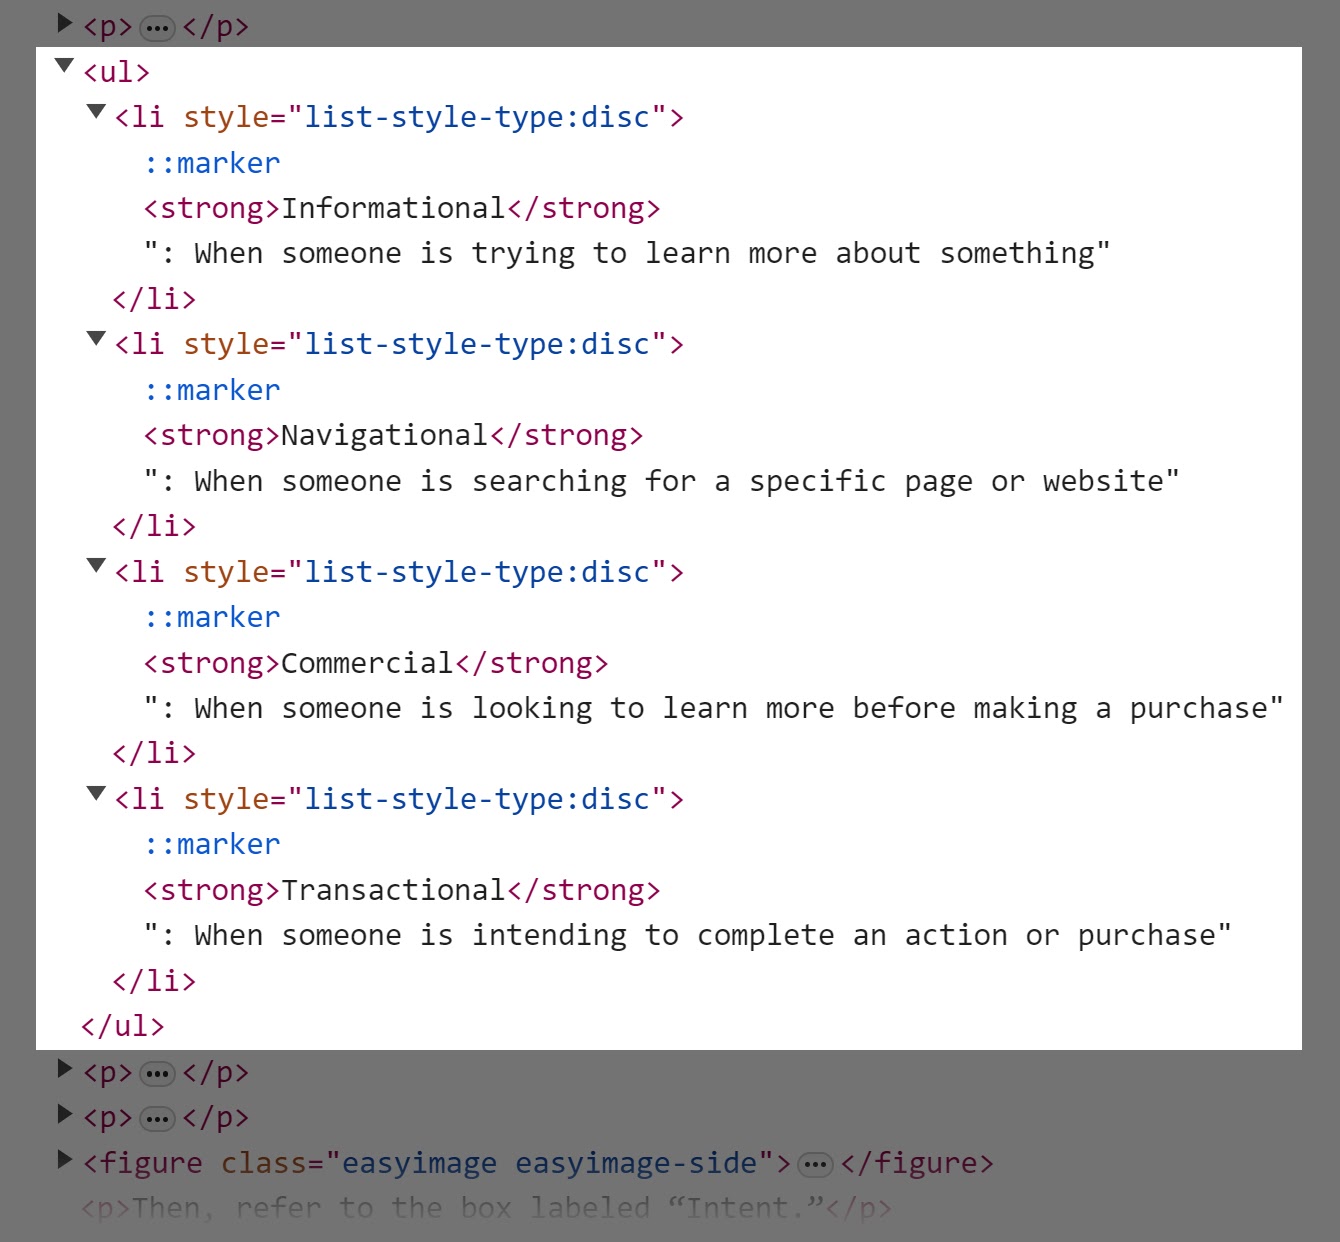
Here’s what a list looks like in HTML:
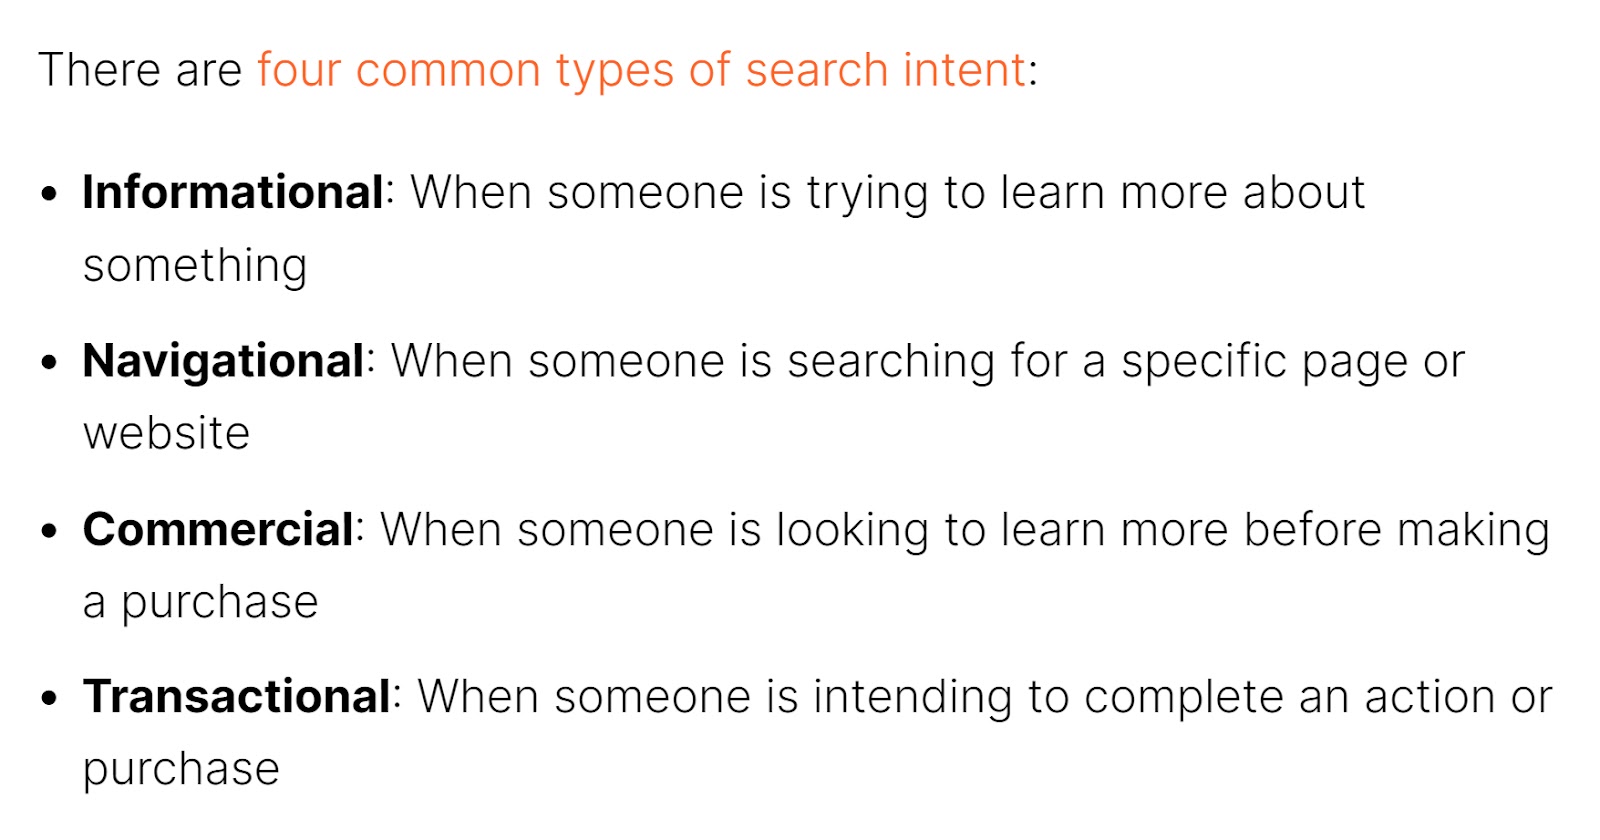
And here’s what it looks like to a visitor:
If your CMS supports copy and pasting from document creation tools (Word, Google Docs, Notion, etc.), tags get applied automatically.
Before creating a list using HTML, choose if you want the list to be ordered or unordered.
- Ordered: Items displayed with corresponding numbers
- Unordered: Items displayed in any order
When writing instructions or a recipe, choose ordered since the user needs to execute the list items in a specific order.
The list can be unordered if the list items don’t need to be executed in succession. An example would be a list of recipe ingredients.
For an ordered list, use the tag <ol> before and the tag </ol> after your list tags.
Inside the <ol> tags, include your list items and surround them with <li> tags in your HTML editor.
Your list will look like this in HTML:
<ol>
<li>First item</li>
<li>Second item</li>
<li>Third item</li>
</ol>
When published on your site, your list will look like this:
- First item
- Second item
- Third item
For unordered, use the tag <ul> to precede and succeed your list tags and surround them with <li> tags in your HTML editor.
Your list will look like this in HTML:
<ul>
<li>Oranges</li>
<li>Sugar</li>
<li>Water</li>
</ul>
When published, your list will look like this:
11. Hyperlinks <a>
Hyperlinks, often referred to simply as “links,” are HTML elements that link one page to another. You can use hyperlinks to help users navigate between pages on the same website. Or you can link to other websites.
Hyperlinks are important for SEO because they help search engines discover and index your content. They also help search engines understand the relationships between different pages.
Hyperlink HTML code is made up of:
- <a>: Anchor tag to denote the beginning of a redirect
- href= “Https://www.exampleurl.com”>: where you’re redirecting the text or image
- Anchor text: Add the text displayed to your visitor (usually existing copy)
- </a>: close the tag
When combined, your hyperlink HTML code will look something like this:
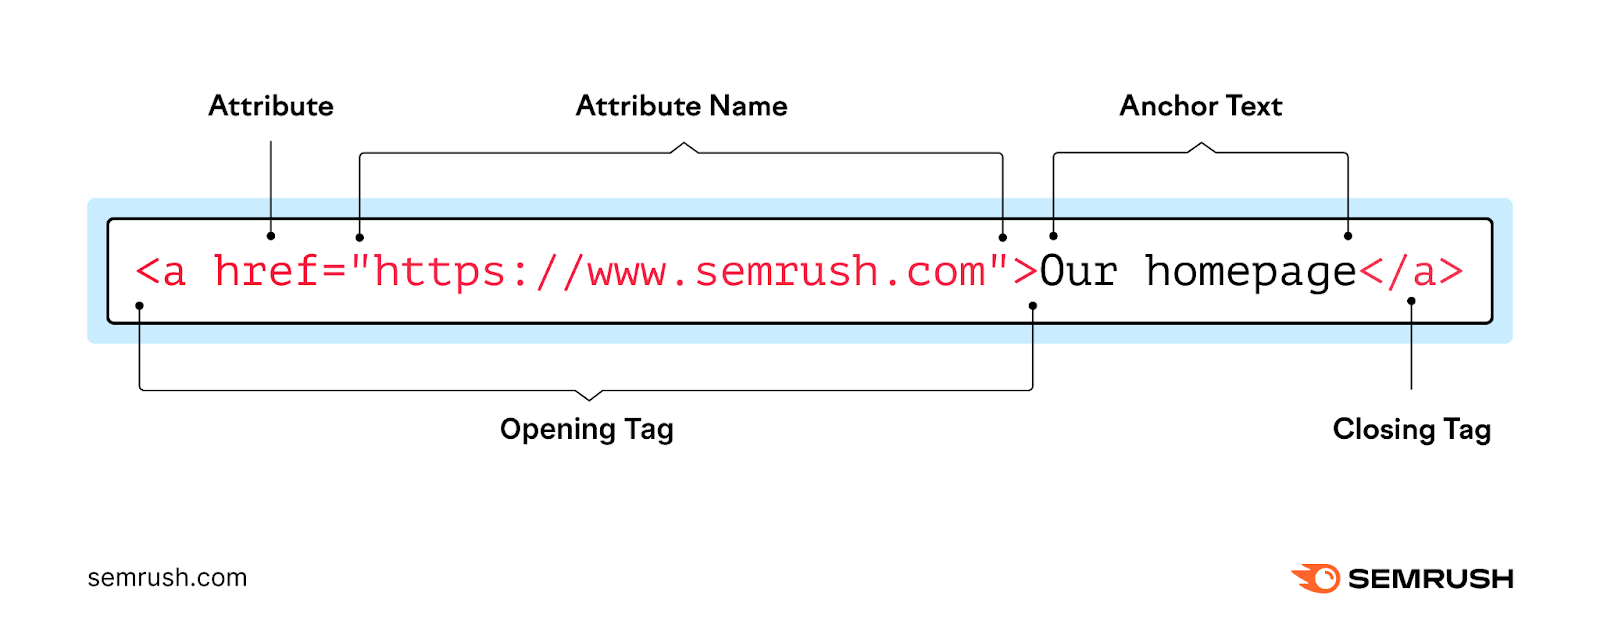
On your published page, a hyperlink looks like this:

If you copied linked text from Google Docs or Word, for example, the link may accompany the text when you paste it somewhere else.
You can also use hyperlinks for internal linking. An internal link is a hyperlink that directs a site visitor to another page on your website.
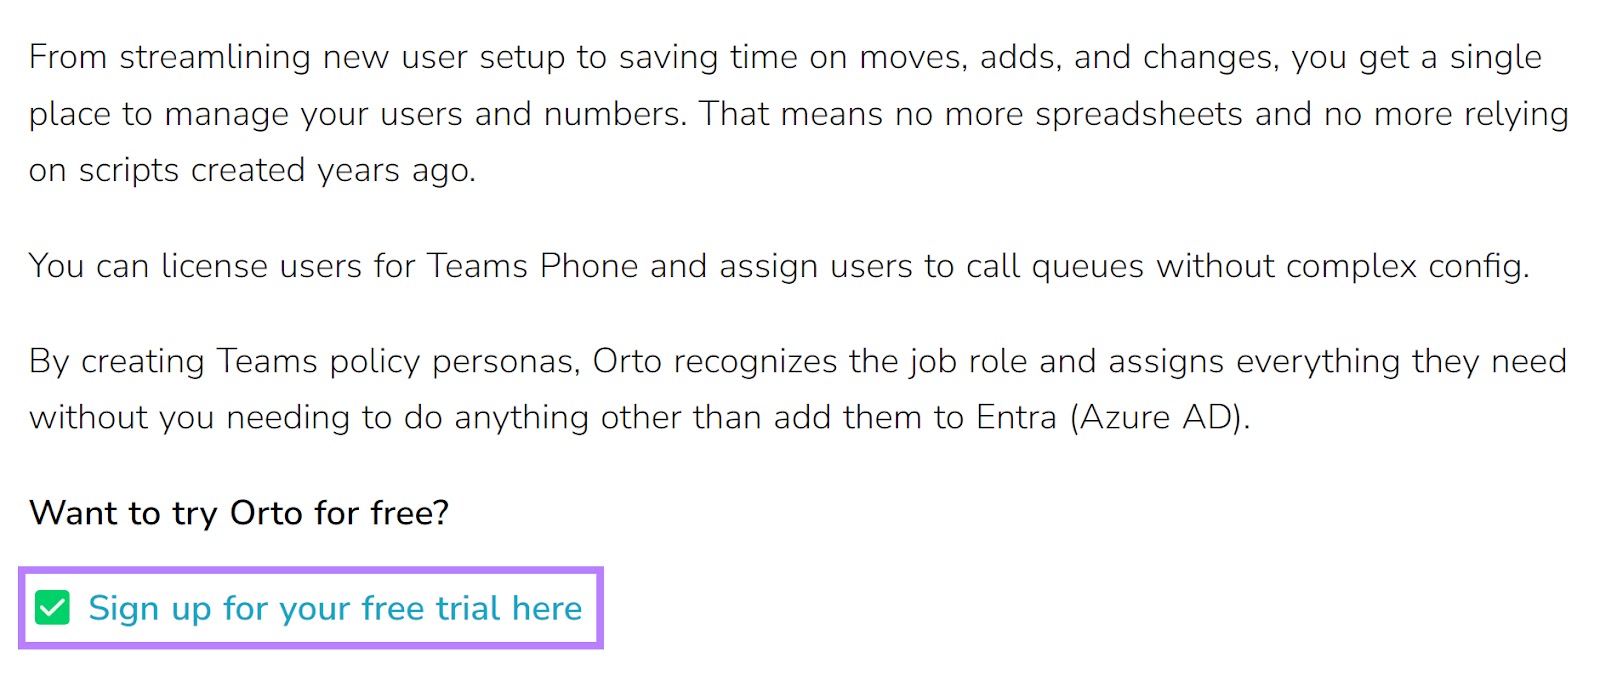
Add internal links to any of your pages. Like your “money pages.” Including contact forms, free trials, and demo requests.
Add a call to action (CTA) to encourage the user to engage further. Like “Sign up for your free trial here.”
Personalizing for different audiences is crucial for generating engagement from platforms other than search engines.
Open graph tags control how you present webpages on social media.
Every blog post you write will likely get shared on social media. Why not boost its performance so it’s more likely to get a click?
Add a new image, title, or description to encourage different social platform audiences to click on your content.
You may want a webpage to display differently on search engines than it does on Twitter, Facebook, or LinkedIn to get more clicks from specific audiences.
So, while your webpage may look like this on search engines and your website:

It can also look like this on social media. (Note the different title.)

Your CMS may have the option to add an Open Graph title without the need to edit HTML code.
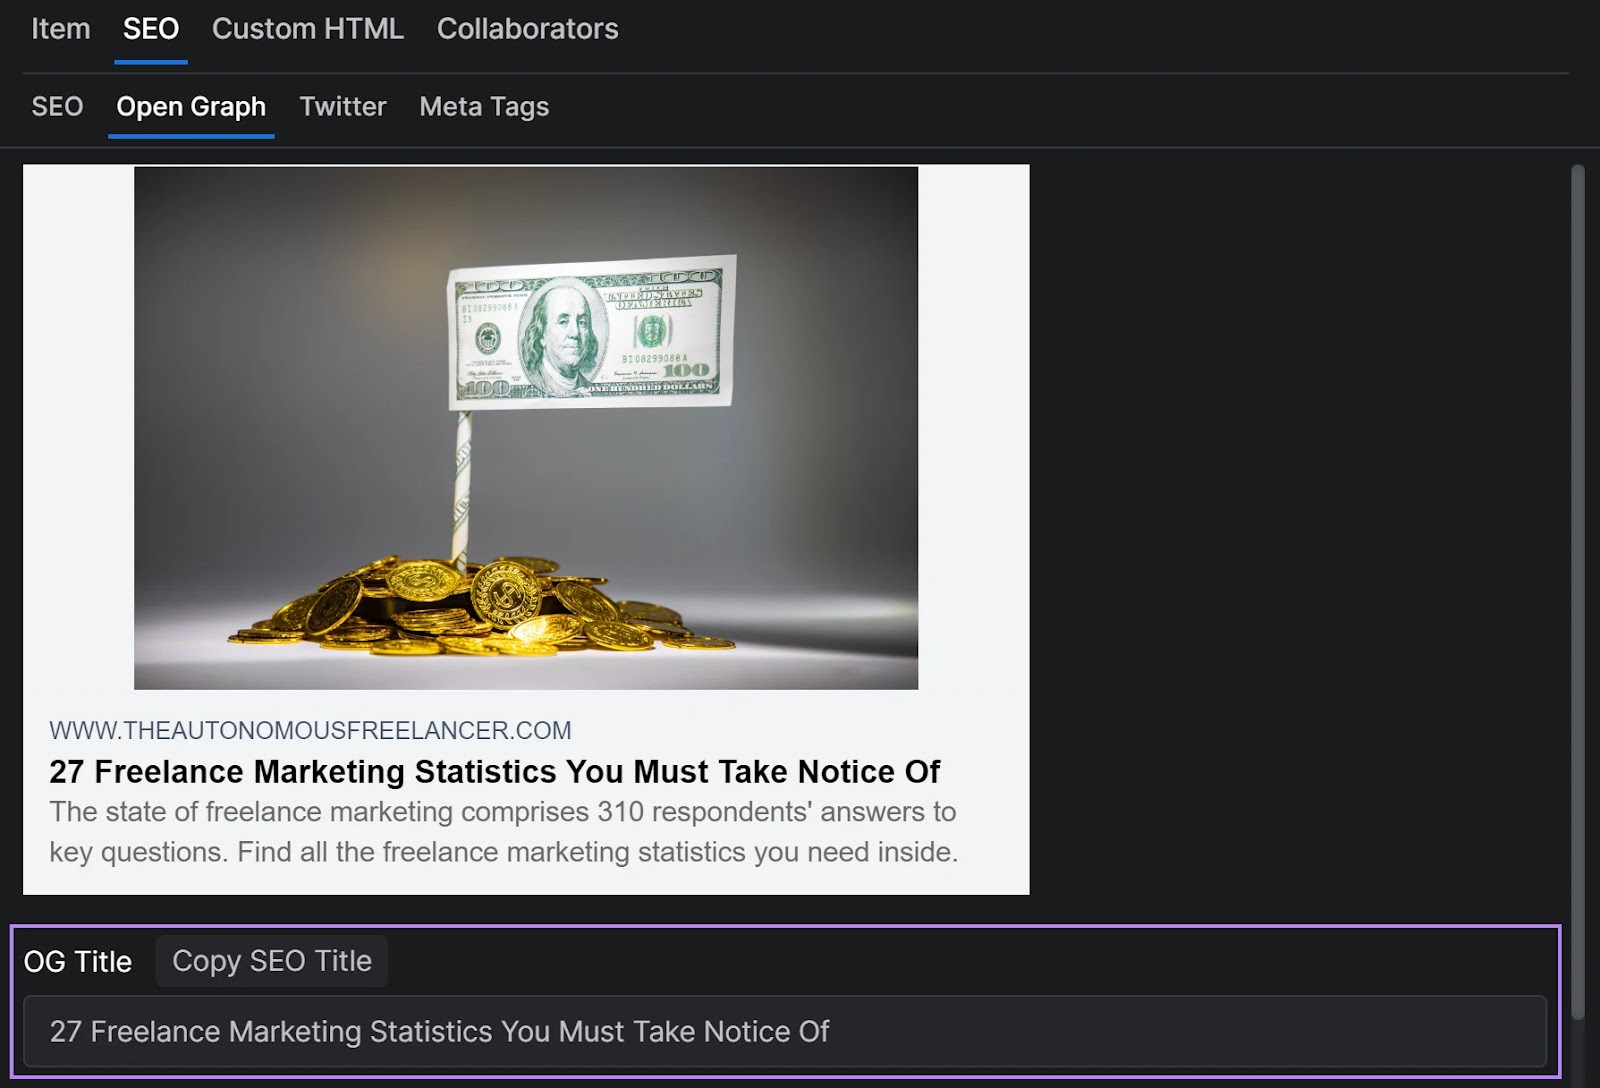
If not, add the following example HTML code to create alternative titles, images, and descriptions when sharing content on social media.
<meta property="og:title" content="Insert Your Title Here">
The main attributes in play here are:
- og:title: Shows a different title than the original content
- og:image: Shows a different image than the original content
- og:description: Shows a different preview description than the original content
You might be using HTML tags without even realizing it. Many CMS automatically apply these tags to your pages.
Follow these best practices to use HTML tags properly:
- Use title tags to inform search engines and users what the main topic of the content is
- Use an H1 header tag to classify the main heading of the page
- Use H2 and H3 header tags to classify and structure subheadings
- Ensure every page has a meta description tag that includes your target keyphrase
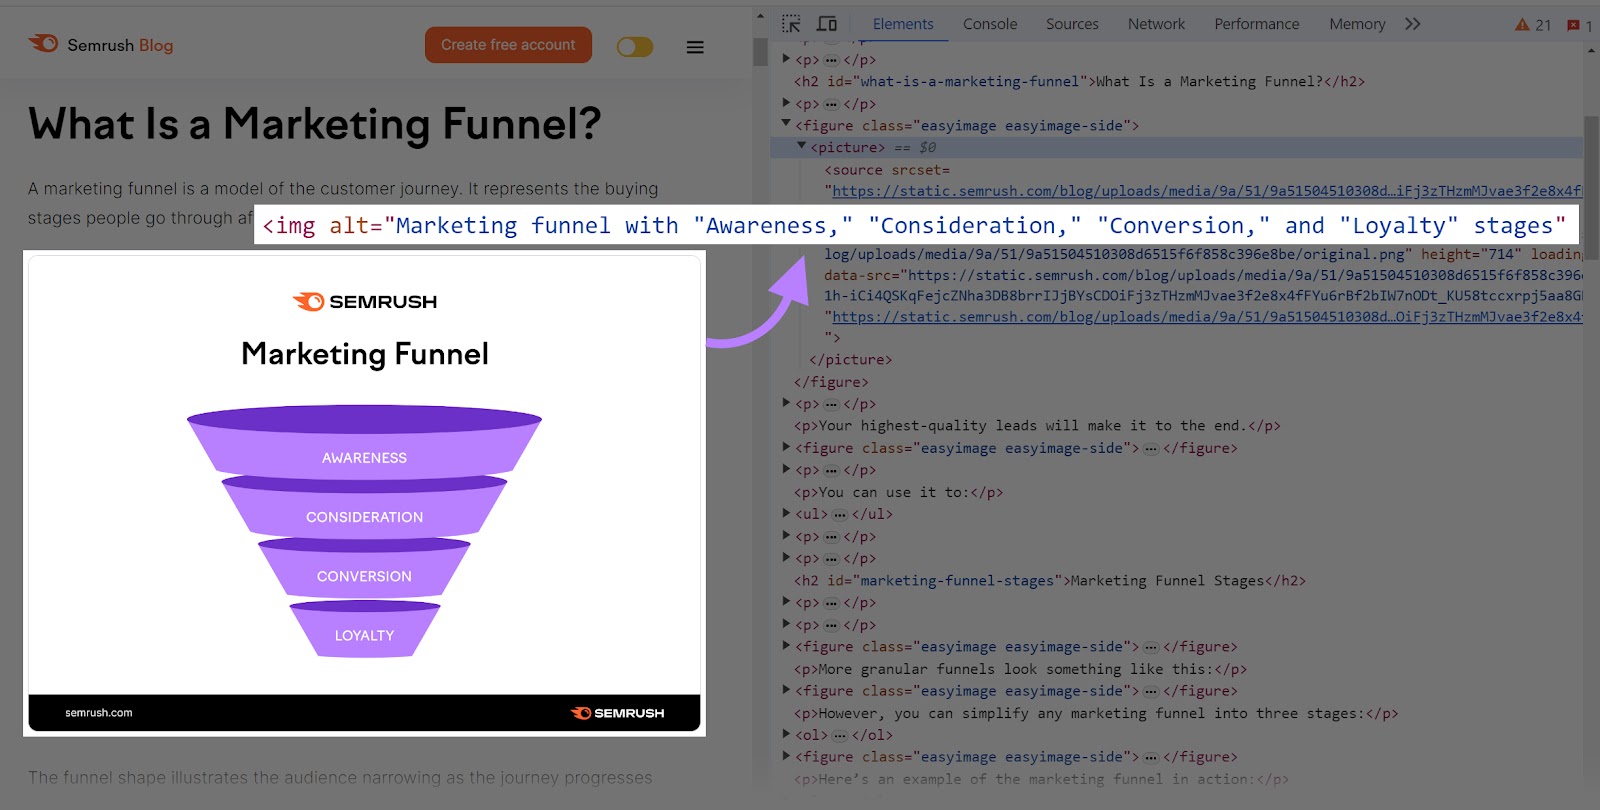
- Add descriptive alt text for important images that support the content
Here’s an example of strategically using a keyword in alt text.
Tools and Resources for SEO Tag Optimization
Using HTML tags is great for SEO, but the process can take time without the right tools.
- Google Tag Manager (GTM): GTM enables the management and deployment of various tags on a website without the need for direct code modifications
- W3Schools HTML online editor: W3Schools provides an online code editor where you can write and practice HTML. It’s great for experimenting with code snippets and testing.
- Schema markup generators: Free tools, such as Google’s Structured Data Markup Helper, will create markup based on your input
- SEO plugins: Popular plugins, like Yoast SEO, offer meta tag generators
Analyze your tags for optimal impact with Semrush’s On Page SEO Checker.
When you’ve completed the setup, you’ll see a dashboard overview like this:
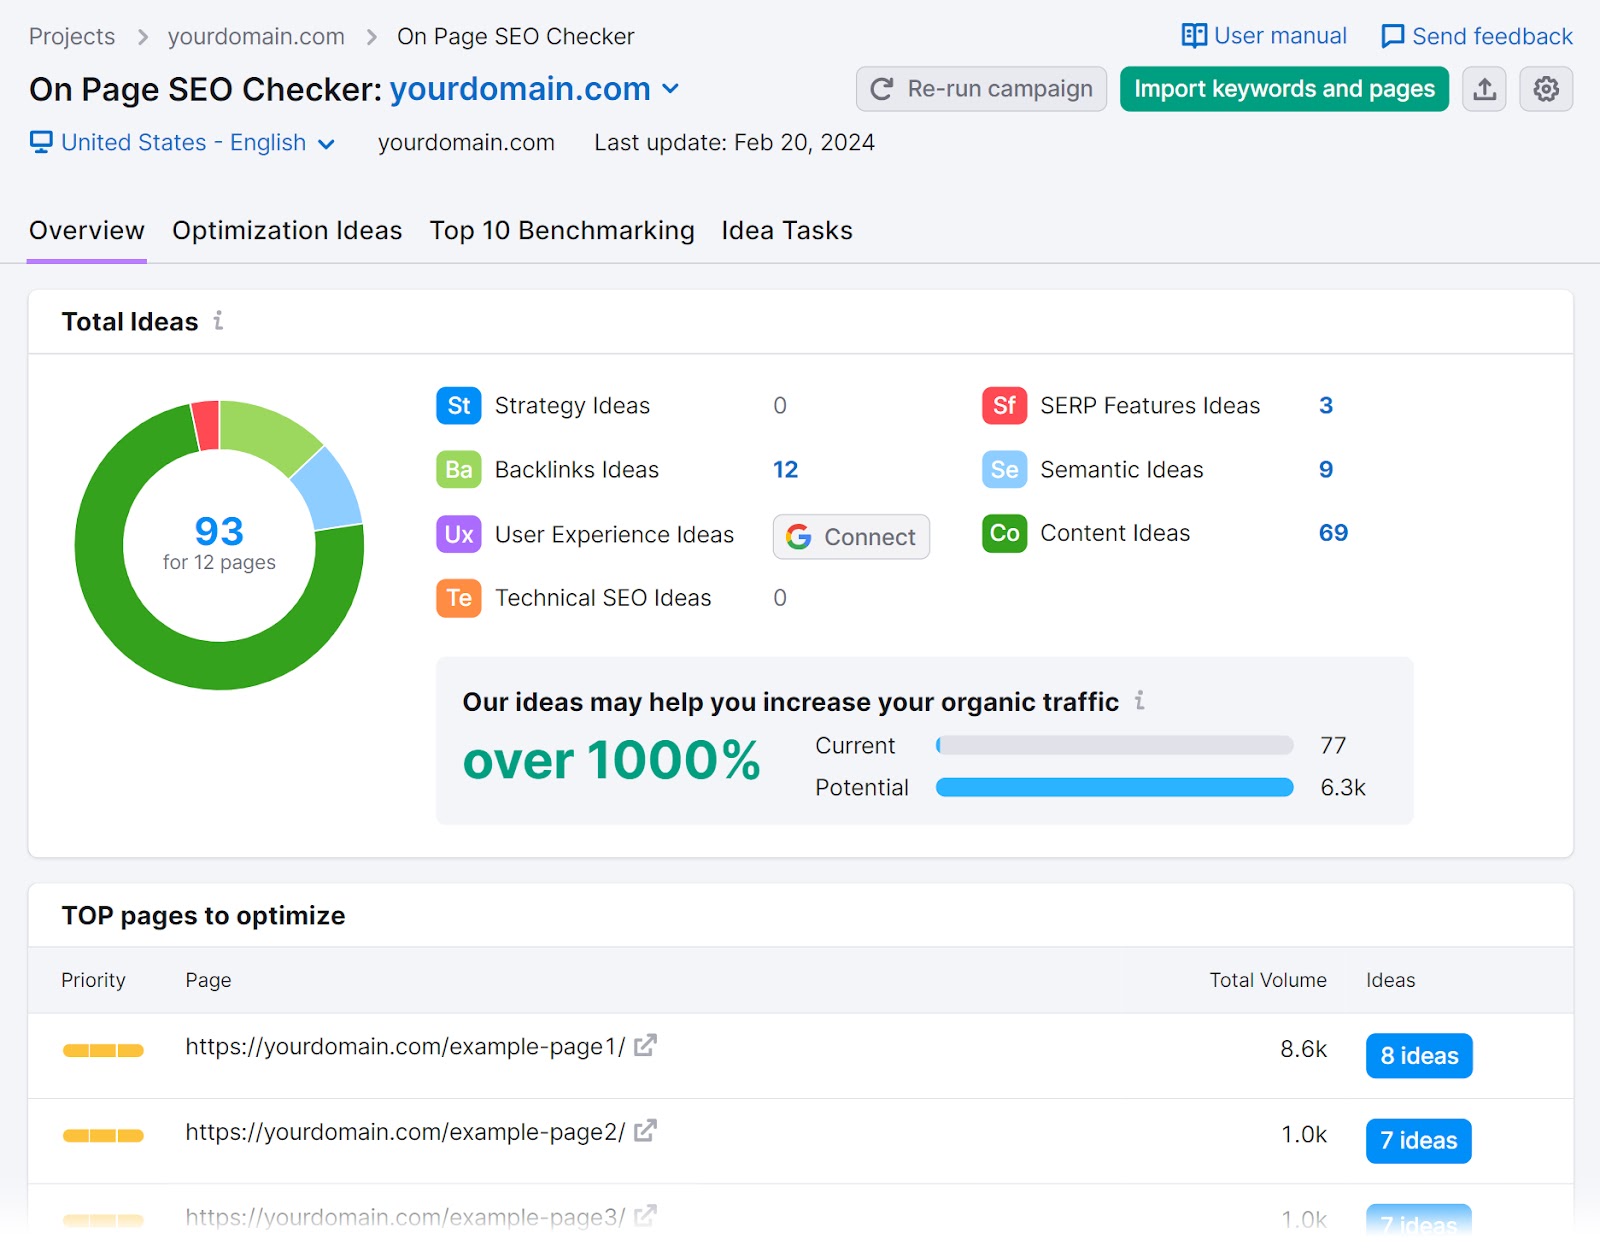
To find opportunities to optimize tags, click on the “Optimization Ideas” tab. The tool will present ideas for optimizing site pages.
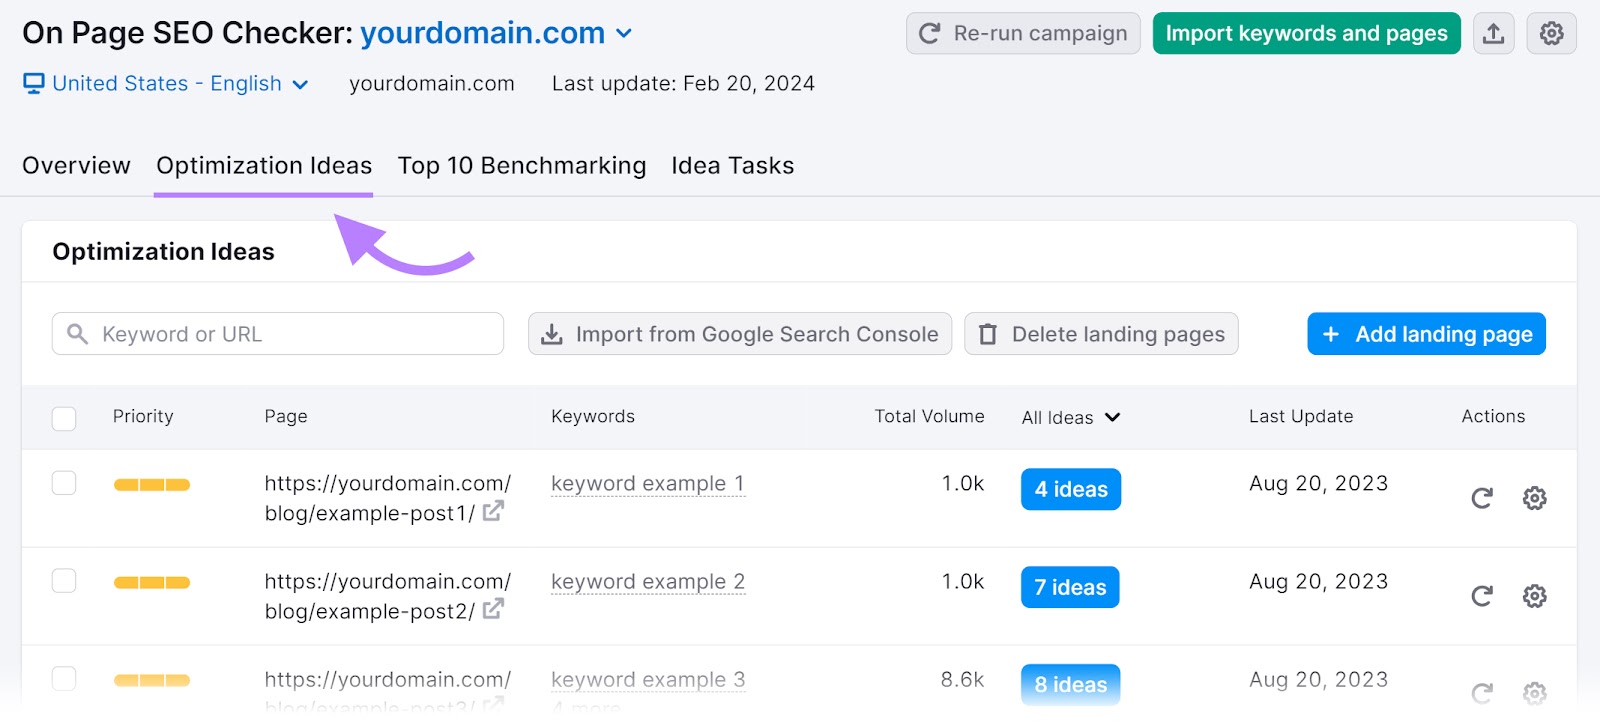
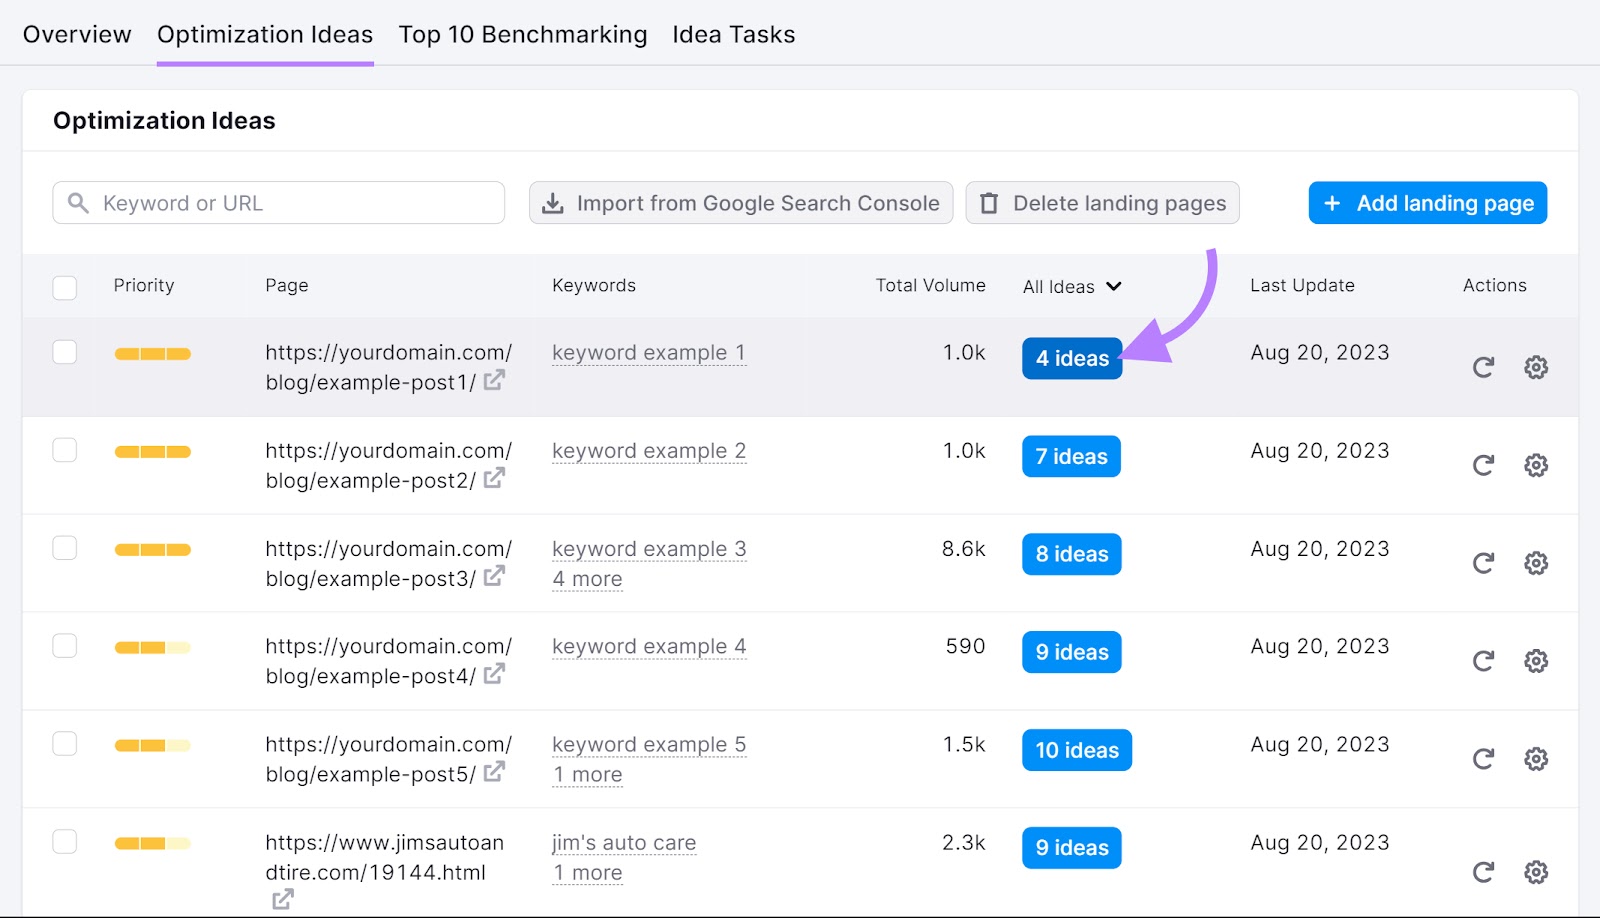
To view page recommendations, click on the blue “# ideas” button in the “All Ideas” column.
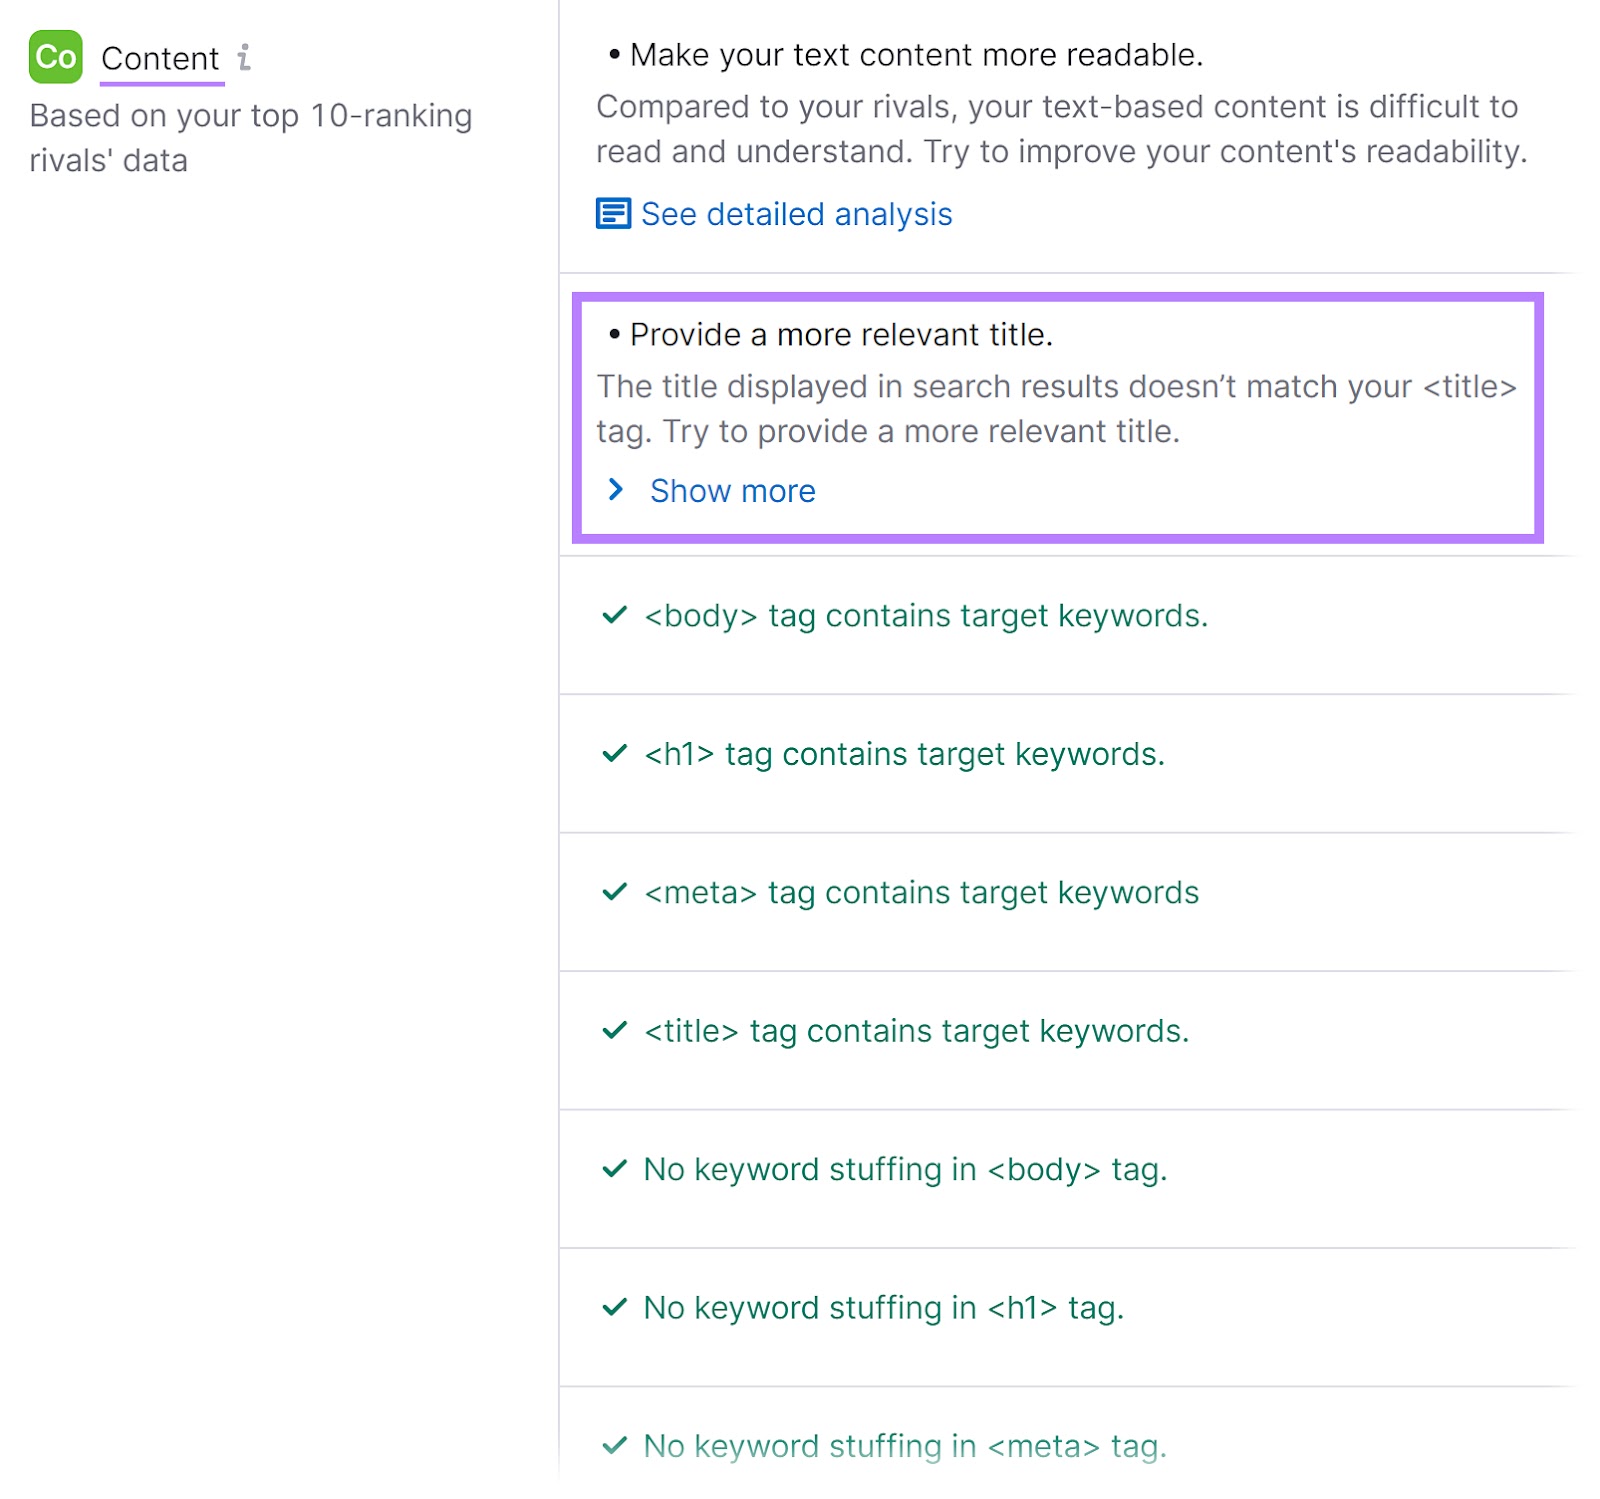
Scroll to the content section. Which evaluates the presence of keywords in your tags. It also alerts you if it detects keyword stuffing.
And provides suggestions for fixing tag issues. For example, it might recommend writing a more relevant title tag.
Common Mistakes to Avoid in SEO Tag Implementation
While HTML tags are helpful for SEO, there are still pitfalls to avoid. Here are some strategies to ensure your efforts don’t hinder your search rankings.
Overusing Tags or Keyword Stuffing
Excessive use of HTML tags—such as multiple title or meta description tags—can harm your SEO efforts. Stuffing keywords in HTML tags is also not recommended. Both cases can make your site appear spammy. And could even turn visitors away.
Solution: Use tags when appropriate to enhance your content. Prioritize readability and relevance over excessive keyword use.
Poorly Optimized Title Tags and Meta Descriptions
Forgetting HTML meta tags for SEO is common. Some CMS will create them automatically—such as title tags—but you still need to optimize them for your brand. And target keywords.
Solution: Write descriptive, keyword-rich title tags that convey the page’s content. Similarly, write keyword-rich meta descriptions that entice people to click.
Header tags organize content hierarchically. Ignoring or forgetting them can prevent search engines from understanding the page’s structure.
Solution: Use header tags to organize the page’s structure.
Using HTML tags can help your website rank higher, generate more clicks, and improve your content’s readability.
By following the best practices in this guide, you can use HTML tags throughout your site to offer a good experience to both users and search engines.
Assess if your site uses HTML tags properly with the Semrush SEO Audit tool. And get a complete picture of your site’s health.


